Introduction
Interestingly, microcontrollers like Arduino can be used for more than just electronic devices or technology. They can also be used for fun projects by beginners and experts alike. The LED pattern circuit is used in one of those projects. Today, LED-powered strip lights are widely used in homes and businesses.
You’ve likely seen them in places like mirrors or as part of wedding décor. They are used at celebrations like birthdays because of their reputation as a superb source of ambient lighting.
This article discusses the WS2812B addressable RGB LED strip. All comparable LED strips, including those in the WS28XX family, Neopixel strips, and others, may be used using the instructions provided in this tutorial. The WS2812B addressable LED strip is available in a few different models, each of which varies in size and sealant.
What is WS2812B?
The WS2812B advanced control LED light source combines the control circuit and RGB chip into a single package. It has a signal-boosting circuit that can reshape the signal and a clever digital port data latch. In addition, it has an inbuilt precision oscillator and a constant current control port for 5 Voltage, all of which work together to maintain a constant pixel point light.

Hardware Components
You will require the following hardware.
Schematic
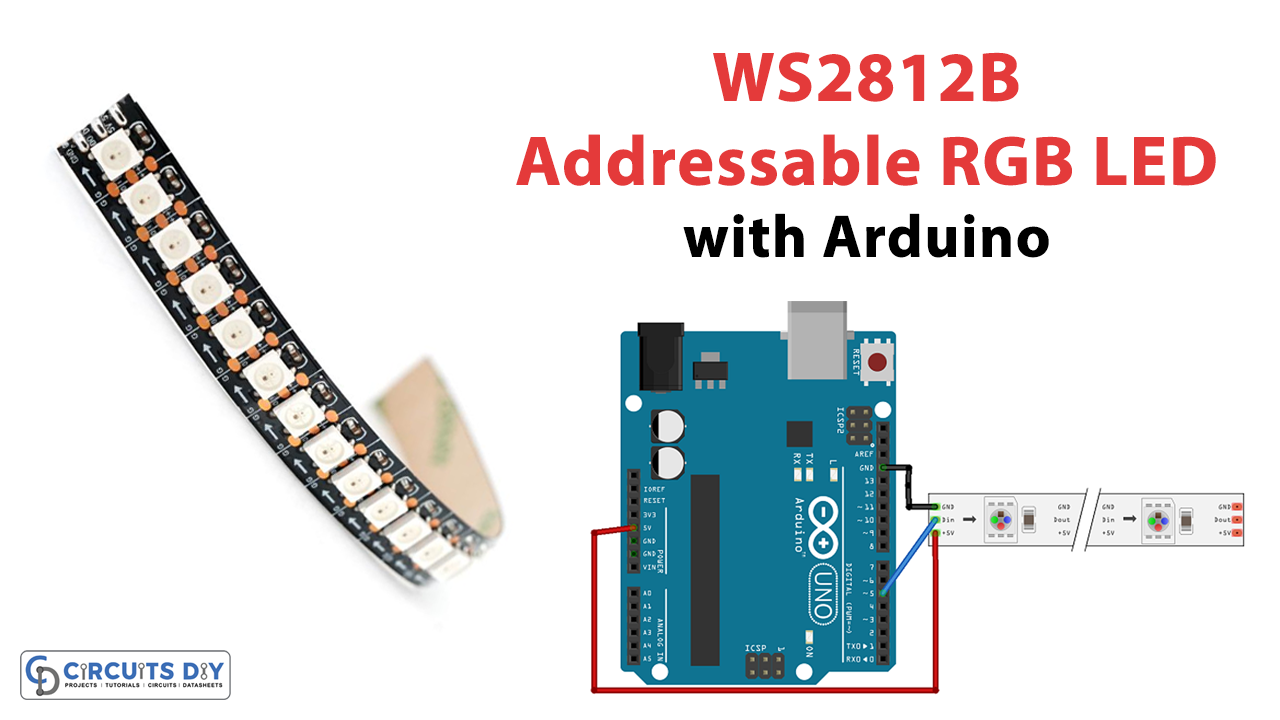
Make connections according to the circuit diagram given below.

Wiring / Connections
| WS2812B | Arduino UNO |
|---|---|
| GND | GND |
| Din | D5 |
| 5V | +5V |
Installing Arduino IDE
First, you need to install Arduino IDE Software from its official website Arduino. Here is a simple step-by-step guide on “How to install Arduino IDE“.
Installing Libraries
Before you start uploading a code, download and unzip the following libraries at /Progam Files(x86)/Arduino/Libraries (default), in order to use the sensor with the Arduino board. Here is a simple step-by-step guide on “How to Add Libraries in Arduino IDE“.
Code
Now copy the following code and upload it to Arduino IDE Software.
#include <FastLED.h>
#define LED_PIN     6
#define NUM_LEDS    8
CRGB leds[NUM_LEDS];
void setup() {
  FastLED.addLeds<WS2812, LED_PIN, GRB>(leds, NUM_LEDS);
}
void loop() {
  for (int i = 0; i <= 7; i++) {
    leds[i] = CRGB ( 0, 0, 255);
    FastLED.show();
    delay(40);
  }
  for (int i = 7; i >= 0; i--) {
    leds[i] = CRGB ( 255, 0, 0);
    FastLED.show();
    delay(40);
  }
   for (int i = 0; i <= 7; i++) {
    leds[i] = CRGB ( 0, 255, 0);
    FastLED.show();
    delay(40);
  }
}
Let’s Test It
Now is the time to put the circuit through its tests. After you have completed wiring everything up and uploaded the code, the RGB LED will begin to function according to the code’s instructions.
Working Explanation
To understand the working, you may need to understand the coding. So, here is its explanation:
- To begin, we need to include the FastLED library.
- Then we define the pin to which the data from the LED strip is connected, define the number of LEDs, and create an array called CRGB. This type includes the LEDs and has three one-byte data members for each colour channel (red, green, and blue).
- In the void setup, we only require initializing the FastLED using the specified settings.
- In the void loop, we make adjustments to the LEDs we choose. We can change the colour of any LED by using the CRGB function and the colour parameters of red, green, and blue. To have the modification take effect on the LEDs, we need to make a call to the function named FastLED.show ().
Applications
- Decorative Lighting for Homes and Bedrooms
- Decorating for parties and weddings
- Creative Stage Lighting
- DIY electronic projects, etc
Conclusion.
We hope you have found this WS2812B Addressable RGB LED Interfacing with Arduino Circuit very useful. If you feel any difficulty making it feel free to ask anything in the comment section.