Introduction
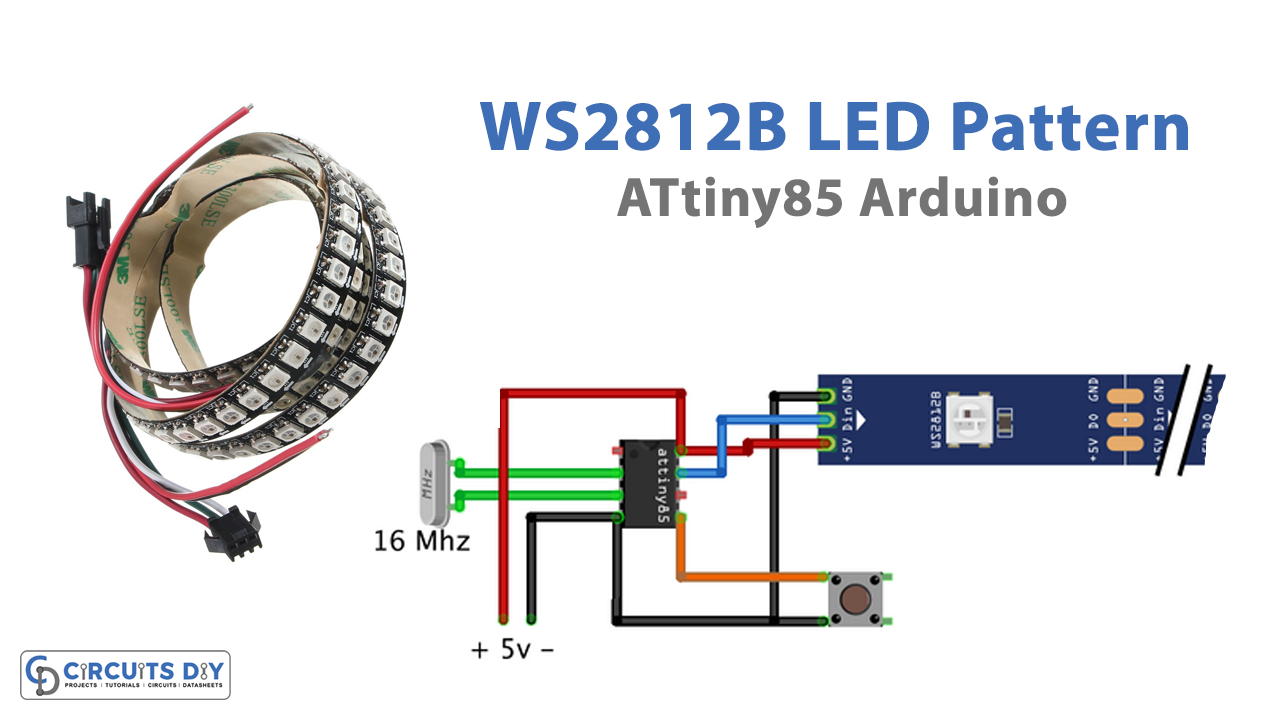
It is intriguing to see that microcontrollers like Arduino can not exclusively be utilized in the industrial sector or for modern purposes however can likewise be used for different DIY and fun ventures for novices and enthusiasts. One of those DIY projects incorporates the LED pattern circuit. LED Driven strip lights are a lot of common these days. You have seen them at wedding places, in-room decoration, and mirrors for enhancement. It’s considered great for party lighting and that is the reason utilized in birthday parties. Cafes and restaurants likewise utilize these strips to make their food place excellent for other people. Also, the goal is that it draws in the consideration of individuals around. This article is about making WS2812B LED Pattern using Attiny85 Arduino
Hardware Components
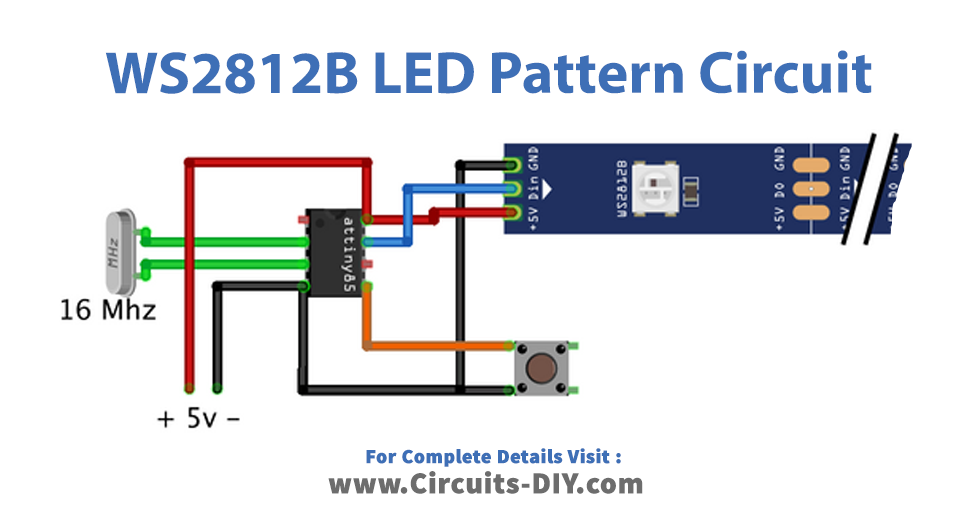
Circuit Diagram
CODE WS2812b LED Pattern 01
// Circuits DIY
// For Complete Details Visit -> https://circuits-diy.com
#include <Adafruit_NeoPixel.h>

// Parameter 3 = pixel type flags, add together as needed:
//   NEO_KHZ800  800 KHz bitstream (most NeoPixel products w/WS2812 LEDs)
//   NEO_KHZ400  400 KHz (classic 'v1' (not v2) FLORA pixels, WS2811 drivers)
//   NEO_GRB     Pixels are wired for GRB bitstream (most NeoPixel products)
//   NEO_RGB     Pixels are wired for RGB bitstream (v1 FLORA pixels, not v2)
#define PIN 2
#define NUM_PIX 40
Adafruit_NeoPixel strip = Adafruit_NeoPixel(NUM_PIX, PIN, NEO_GRB + NEO_KHZ800);

void setup()
{
  strip.begin();
  strip.show(); // Инициализация , все светодиоды выключены
}

void loop()
{

    rgbFade(0, 0, 255, 5); // синий
    rgbFade(0, 0, 255, 5); // синий
    rgbFade(0, 0, 255, 5); // синий


   runPix(20, 10);

  // Some example procedures showing how to display to the pixels:
  colorWipe(strip.Color(0, 0, 255), 50); // Blue
  colorWipe(strip.Color(0, 255, 0), 50); // Green
  colorWipe(strip.Color(255, 0, 0), 50); // Red

  // Send a theater pixel chase in...
  theaterChase(strip.Color(127,   0,   0), 50); // Red
  theaterChase(strip.Color(  0,   0, 127), 50); // Blue
  theaterChase(strip.Color(127, 127, 127), 50); // White

  rainbow(20);
  rainbowCycle(20);
  theaterChaseRainbow(50);

  flame(255, 150);
}

//бегущий пиксель
void runPix(uint8_t cicles, uint8_t wait)
{
  strip.setBrightness(255);
  for(int c=0; c<cicles; c++)
  {
   for(int i=0; i<strip.numPixels(); i++)
   {
    strip.setPixelColor(i, strip.Color(0,0,255));
    strip.show();
    strip.setPixelColor(i, strip.Color(0,0,0));
    delay(wait);
   }
  }
}

//эффект пламени
void flame(uint8_t cicles, uint8_t wait)
{
 strip.setBrightness(255);
 for(int i=0; i<cicles; i++)
  {
   for(int i=0; i<strip.numPixels(); i++)
   {
    strip.setPixelColor(i, strip.Color(random(150, 254), random(0, 45), 0));
   }
    strip.setBrightness(random(151,254));
    strip.show(); // This sends the updated pixel color to the hardware.
    delay(random(wait));
 }
}

// плавное наростание яркости любого цвета
void rgbFade(uint8_t red, uint8_t green, uint8_t blue, uint8_t wait)
{
  strip.setBrightness(255);
  for(uint8_t b=0; b<255; b++)
  {
     for(uint8_t i=0; i<strip.numPixels(); i++)
     {
        strip.setPixelColor(i, red * b/255, green * b/255, blue * b/255);
     }
     strip.show();
     delay(wait);
  }
delay(500);

  for(uint8_t b=255; b > 0; b--)
  {
     for(uint8_t i = 0; i < strip.numPixels(); i++)
     {
        strip.setPixelColor(i, red * b/255, green * b/255, blue * b/255);
     }
     strip.show();
     delay(wait);
  }
   strip.setBrightness(0);
   strip.show();
  delay(200);
}

// //заполнение ленты пиксель за пикселем
void colorWipe(uint32_t c, uint8_t wait)
{
  strip.setBrightness(255);
  for(uint16_t i=0; i<strip.numPixels(); i++)
  {
      strip.setPixelColor(i, c);
      strip.show();
      delay(wait);
  }
}

//радуга
void rainbow(uint8_t wait)
{
  uint16_t i, j;

strip.setBrightness(255);
  for(j=0; j<256; j++) {
    for(i=0; i<strip.numPixels(); i++) {
      strip.setPixelColor(i, Wheel((i+j) & 255));
    }
    strip.show();
    delay(wait);
  }
}

// Slightly different, this makes the rainbow equally distributed throughout
void rainbowCycle(uint8_t wait)
{
  uint16_t i, j;

strip.setBrightness(255);
  for(j=0; j<256*5; j++) { // 5 cycles of all colors on wheel
    for(i=0; i< strip.numPixels(); i++) {
      strip.setPixelColor(i, Wheel(((i * 256 / strip.numPixels()) + j) & 255));
    }
    strip.show();
    delay(wait);
  }
}

//Theatre-style crawling lights.
void theaterChase(uint32_t c, uint8_t wait)
{
 strip.setBrightness(255);
  for (int j=0; j<10; j++) {  //do 10 cycles of chasing
    for (int q=0; q < 3; q++) {
      for (int i=0; i < strip.numPixels(); i=i+3) {
        strip.setPixelColor(i+q, c);    //turn every third pixel on
      }
      strip.show();

      delay(wait);

      for (int i=0; i < strip.numPixels(); i=i+3) {
        strip.setPixelColor(i+q, 0);        //turn every third pixel off
      }
    }
  }
}

//Theatre-style crawling lights with rainbow effect
void theaterChaseRainbow(uint8_t wait)
{
strip.setBrightness(255);
  for (int j=0; j < 256; j++) {     // cycle all 256 colors in the wheel
    for (int q=0; q < 3; q++) {
        for (int i=0; i < strip.numPixels(); i=i+3) {
          strip.setPixelColor(i+q, Wheel( (i+j) % 255));    //turn every third pixel on
        }
        strip.show();

        delay(wait);

        for (int i=0; i < strip.numPixels(); i=i+3) {
          strip.setPixelColor(i+q, 0);        //turn every third pixel off
        }
    }
  }
}

// Input a value 0 to 255 to get a color value.
// The colours are a transition r - g - b - back to r.
uint32_t Wheel(byte WheelPos)
{
  strip.setBrightness(255);
  WheelPos = 255 - WheelPos;
  if(WheelPos < 85) {
   return strip.Color(255 - WheelPos * 3, 0, WheelPos * 3);
  } else if(WheelPos < 170) {
    WheelPos -= 85;
   return strip.Color(0, WheelPos * 3, 255 - WheelPos * 3);
  } else {
   WheelPos -= 170;
   return strip.Color(WheelPos * 3, 255 - WheelPos * 3, 0);
  }
}
CODE WS2812b LED Pattern 02
// Circuits DIY
// For Complete Details Visit -> https://circuits-diy.com
#include <Adafruit_NeoPixel.h>

// Parameter 3 = pixel type flags, add together as needed:
//   NEO_KHZ800  800 KHz bitstream (most NeoPixel products w/WS2812 LEDs)
//   NEO_KHZ400  400 KHz (classic 'v1' (not v2) FLORA pixels, WS2811 drivers)
//   NEO_GRB     Pixels are wired for GRB bitstream (most NeoPixel products)
//   NEO_RGB     Pixels are wired for RGB bitstream (v1 FLORA pixels, not v2)
#define PIN 2
#define NUM_PIX 40
Adafruit_NeoPixel strip = Adafruit_NeoPixel(NUM_PIX, PIN, NEO_GRB + NEO_KHZ800);

void setup()
{
  strip.begin();
  strip.show(); // Инициализация , все светодиоды выключены
}

void loop()
{

    rgbFade(0, 0, 255, 5); // синий
    rgbFade(0, 0, 255, 5); // синий
    rgbFade(0, 0, 255, 5); // синий


   runPix(20, 10);

  // Some example procedures showing how to display to the pixels:
  colorWipe(strip.Color(0, 0, 255), 50); // Blue
  colorWipe(strip.Color(0, 255, 0), 50); // Green
  colorWipe(strip.Color(255, 0, 0), 50); // Red

  // Send a theater pixel chase in...
  theaterChase(strip.Color(127,   0,   0), 50); // Red
  theaterChase(strip.Color(  0,   0, 127), 50); // Blue
  theaterChase(strip.Color(127, 127, 127), 50); // White

  rainbow(20);
  rainbowCycle(20);
  theaterChaseRainbow(50);

  flame(255, 150);
}

//бегущий пиксель
void runPix(uint8_t cicles, uint8_t wait)
{
  strip.setBrightness(255);
  for(int c=0; c<cicles; c++)
  {
   for(int i=0; i<strip.numPixels(); i++)
   {
    strip.setPixelColor(i, strip.Color(0,0,255));
    strip.show();
    strip.setPixelColor(i, strip.Color(0,0,0));
    delay(wait);
   }
  }
}

//эффект пламени
void flame(uint8_t cicles, uint8_t wait)
{
 strip.setBrightness(255);
 for(int i=0; i<cicles; i++)
  {
   for(int i=0; i<strip.numPixels(); i++)
   {
    strip.setPixelColor(i, strip.Color(random(150, 254), random(0, 45), 0));
   }
    strip.setBrightness(random(151,254));
    strip.show(); // This sends the updated pixel color to the hardware.
    delay(random(wait));
 }
}

// плавное наростание яркости любого цвета
void rgbFade(uint8_t red, uint8_t green, uint8_t blue, uint8_t wait)
{
  strip.setBrightness(255);
  for(uint8_t b=0; b<255; b++)
  {
     for(uint8_t i=0; i<strip.numPixels(); i++)
     {
        strip.setPixelColor(i, red * b/255, green * b/255, blue * b/255);
     }
     strip.show();
     delay(wait);
  }
delay(500);

  for(uint8_t b=255; b > 0; b--)
  {
     for(uint8_t i = 0; i < strip.numPixels(); i++)
     {
        strip.setPixelColor(i, red * b/255, green * b/255, blue * b/255);
     }
     strip.show();
     delay(wait);
  }
   strip.setBrightness(0);
   strip.show();
  delay(200);
}

// //заполнение ленты пиксель за пикселем
void colorWipe(uint32_t c, uint8_t wait)
{
  strip.setBrightness(255);
  for(uint16_t i=0; i<strip.numPixels(); i++)
  {
      strip.setPixelColor(i, c);
      strip.show();
      delay(wait);
  }
}

//радуга
void rainbow(uint8_t wait)
{
  uint16_t i, j;

strip.setBrightness(255);
  for(j=0; j<256; j++) {
    for(i=0; i<strip.numPixels(); i++) {
      strip.setPixelColor(i, Wheel((i+j) & 255));
    }
    strip.show();
    delay(wait);
  }
}

// Slightly different, this makes the rainbow equally distributed throughout
void rainbowCycle(uint8_t wait)
{
  uint16_t i, j;

strip.setBrightness(255);
  for(j=0; j<256*5; j++) { // 5 cycles of all colors on wheel
    for(i=0; i< strip.numPixels(); i++) {
      strip.setPixelColor(i, Wheel(((i * 256 / strip.numPixels()) + j) & 255));
    }
    strip.show();
    delay(wait);
  }
}

//Theatre-style crawling lights.
void theaterChase(uint32_t c, uint8_t wait)
{
 strip.setBrightness(255);
  for (int j=0; j<10; j++) {  //do 10 cycles of chasing
    for (int q=0; q < 3; q++) {
      for (int i=0; i < strip.numPixels(); i=i+3) {
        strip.setPixelColor(i+q, c);    //turn every third pixel on
      }
      strip.show();

      delay(wait);

      for (int i=0; i < strip.numPixels(); i=i+3) {
        strip.setPixelColor(i+q, 0);        //turn every third pixel off
      }
    }
  }
}

//Theatre-style crawling lights with rainbow effect
void theaterChaseRainbow(uint8_t wait)
{
strip.setBrightness(255);
  for (int j=0; j < 256; j++) {     // cycle all 256 colors in the wheel
    for (int q=0; q < 3; q++) {
        for (int i=0; i < strip.numPixels(); i=i+3) {
          strip.setPixelColor(i+q, Wheel( (i+j) % 255));    //turn every third pixel on
        }
        strip.show();

        delay(wait);

        for (int i=0; i < strip.numPixels(); i=i+3) {
          strip.setPixelColor(i+q, 0);        //turn every third pixel off
        }
    }
  }
}

// Input a value 0 to 255 to get a color value.
// The colours are a transition r - g - b - back to r.
uint32_t Wheel(byte WheelPos)
{
  strip.setBrightness(255);
  WheelPos = 255 - WheelPos;
  if(WheelPos < 85) {
   return strip.Color(255 - WheelPos * 3, 0, WheelPos * 3);
  } else if(WheelPos < 170) {
    WheelPos -= 85;
   return strip.Color(0, WheelPos * 3, 255 - WheelPos * 3);
  } else {
   WheelPos -= 170;
   return strip.Color(WheelPos * 3, 255 - WheelPos * 3, 0);
  }
}
Uploading Code In Attiny
- To burn or upload your code you first need to connect attiny85 with a microcontroller like a given diagram
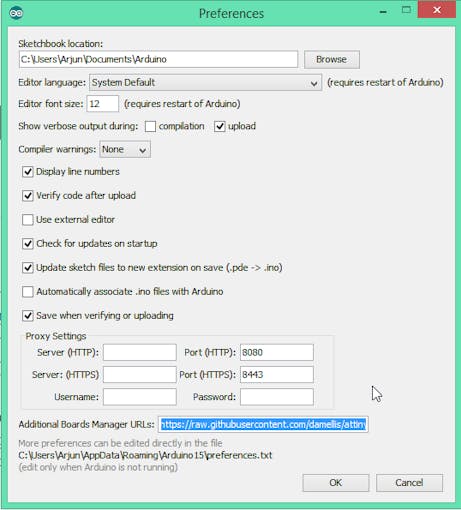
- Know that, There is no ATtiny85 option in Arduino, and hence we have to add ATtiny boards to Arduino IDE. For this Open File -> Preferences and in the Additional Boards Manager URLs, paste the given link https://raw.githubusercontent.com/damellis/attiny/ide-1.6.x-boards-manager/package_damellis_attiny_index.json.
- After you do this, open Tools from the menu bar, go on board and click the Board Manager
- The board manager window will be open. Now, scroll down until you see “Attiny by Davis A. Mellis”. Click on that option and install it.
- When it gets installed, now you could see a new entry in the Board menu
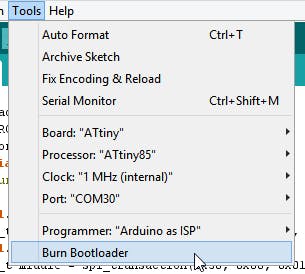
- Now you need to go back to Arduino IDE. Go to the tools, Select Processor: “ATtiny85” option. And select 85 MHz. Below the Processor option, there is a clock option, go there and select 8MHz (internal)
- In the same tool option, there is a Programmer option, select that and then select Arduino as ISP
- The tools also contain the Burn Bootloader option. Select that option.
- You then get the message if the burning bootloader was successful.
- Now open your code and upload that.
Working Explanation
After these connections of the WS2812B LED Pattern that are defined in the circuit diagram, when you turn ON the circuit, it will work as shown by its code. Two different pattern codes characterize the different ranges. You can set up your code that can make your lighting pattern. Then, at that point, there can be the capacities in the codes that set up the irregular colors, highly contrasting tones, purple and green tones, and static colors.
Applications
- It is utilized at wedding parties, and so forth
- It contributes to being used for the enhancement of rooms, furniture, mirrors, and so on