Introduction
Interfacing a 16×2 LCD module with an Arduino UNO microcontroller is a widely used technique for displaying data and messages in various DIY electronics projects. This involves connecting the LCD module to the Arduino board and communicating with it using a special library to display information on its screen. With this setup, the LCD screen can display various types of data such as text, numbers, symbols, and more, making it a versatile component for a wide range of applications.
A 16×2 LCD module is a type of Liquid Crystal Display (LCD) that can display two rows of 16 characters each. It is a commonly used display device in electronics projects and is typically controlled by a microcontroller, such as the Arduino UNO, to display text, numbers, or symbols. The module typically includes a display controller that takes care of all the necessary functions to control the display, such as the generation of the bias voltage and the addressing of the display pixels.
Hardware Components
You will require the following hardware for Interfacing LCD I2C with Arduino.
| S.no | Component | Value | Qty |
|---|---|---|---|
| 1. | Arduino UNO | – | 1 |
| 2. | USB Cable Type A to B | – | 1 |
| 3. | LED | I2C | 1 |
| 4. | Power Adapter for Arduino | 9V | 1 |
| 5. | Jumper Wires | – | 1 |
LCD I2C with Arduino
- Connect the 16×2 LCD module to the Arduino UNO: Connect the LCD module to the Arduino board using the following pin connections:
- RS pin to digital pin 12
- RW pin to GND
- EN pin to digital pin 11
- D4 pin to digital pin 5
- D5 pin to digital pin 4
- D6 pin to digital pin 3
- D7 pin to digital pin 2
- VCC pin to 5V
- GND pin to GND
- Include the LiquidCrystal Library: At the top of the code, include the LiquidCrystal library by adding the following line: copy code
#include <LiquidCrystal.h>- Initialize the LCD: Declare an object for the LiquidCrystal library and initialize it with the following lines of code:scssCopy code
LiquidCrystal lcd(12, 11, 5, 4, 3, 2);- Setup the LCD: In the setup() function, set the number of columns and rows of the LCD using the following line of code:rubyCopy code
lcd.begin(16, 2); - Print “Hello World” on the LCD: In the loop() function, clear the display using the clear() method and then use the print() method to print “Hello World” on the first line of the LCD screen.pythonCopy code
lcd.clear();lcd.print("Hello World");- Upload the code: Finally, upload the code to the Arduino UNO board using the Arduino IDE.
Schematic
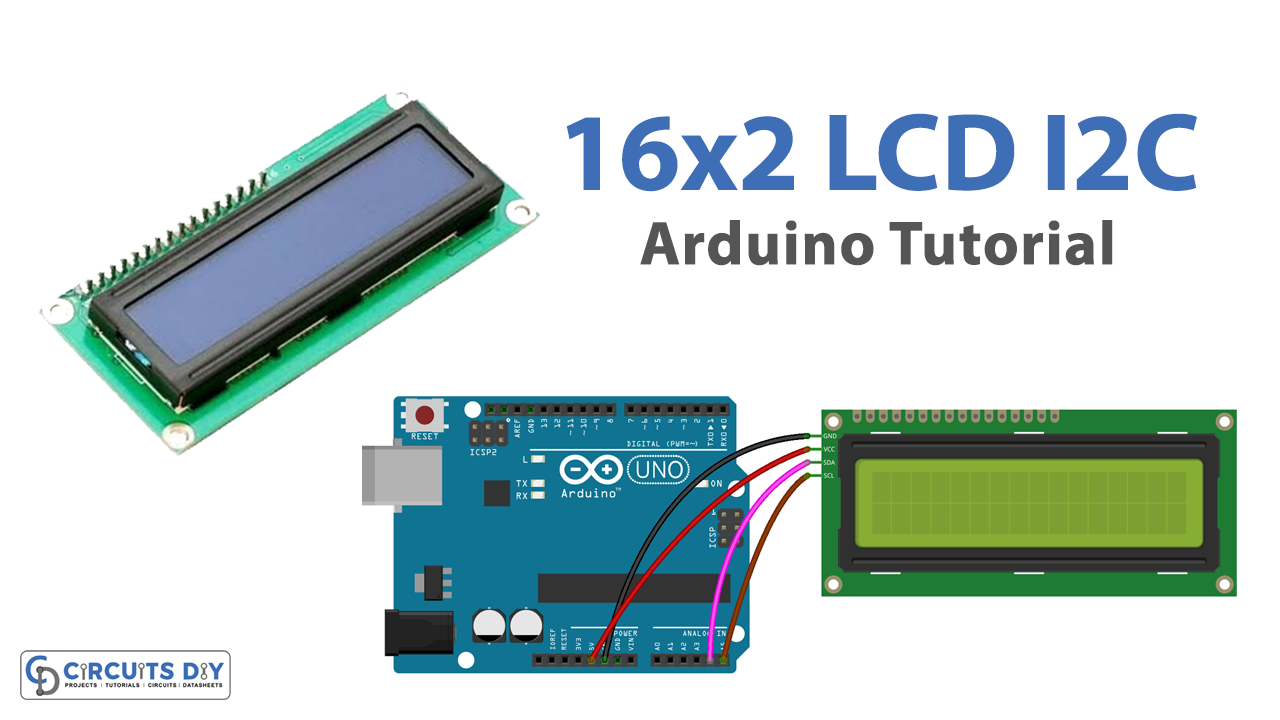
Make connections according to the circuit diagram given below.

Wiring / Connections
| Arduino | Sensor |
|---|---|
| 5V | VCC |
| GND | GND |
| A4 | SDA |
| A5 | SCL |
Installing Arduino IDE
First, you need to install Arduino IDE Software from its official website Arduino. Here is a simple step-by-step guide on “How to install Arduino IDE“.
Installing Libraries
Before you start uploading a code, download and unzip the following libraries at /Progam Files(x86)/Arduino/Libraries (default), in order to use the sensor with the Arduino board. Here is a simple step-by-step guide on “How to Add Libraries in Arduino IDE“.
Code
Now copy the following code and upload it to Arduino IDE Software.
#include <LiquidCrystal_I2C.h>

LiquidCrystal_I2C lcd(0x27, 16, 2); // I2C address 0x27, 16 column and 2 rows

void setup()
{
  lcd.init(); // initialize the lcd
  lcd.backlight();
}

void loop()
{
  lcd.clear();                 // clear display
  lcd.setCursor(0, 0);         // move cursor to   (0, 0)
  lcd.print("Arduino");        // print message at (0, 0)
  lcd.setCursor(2, 1);         // move cursor to   (2, 1)
  lcd.print("GetStarted.com"); // print message at (2, 1)
  delay(2000);                 // display the above for two seconds

  lcd.clear();                  // clear display
  lcd.setCursor(3, 0);          // move cursor to   (3, 0)
  lcd.print("DIYables");        // print message at (3, 0)
  lcd.setCursor(0, 1);          // move cursor to   (0, 1)
  lcd.print("www.diyables.io"); // print message at (0, 1)
  delay(2000);                  // display the above for two seconds
}
Working Explanation
The process of interfacing a 16×2 LCD module with an Arduino UNO Microcontroller involves connecting the LCD module to the microcontroller using a set of wires and then writing a code in the Arduino Integrated Development Environment (IDE) to display any text on the LCD screen. The code first sets up the communication between the microcontroller and the LCD module by initializing the pins used for data and control signals. The code then sends commands to the LCD module to clear the screen and set the cursor position. Finally, the code sends characters to the LCD module to display any text, for e.g. “Hello World”.
Applications
- Debugging and testing microcontroller programs
- Displaying status information for projects and systems
- Data logging and recording
- Interactive menus and user interfaces for DIY projects
- Displaying messages and notifications
Conclusion.
We hope you have found this LCD I2C Circuit very useful. If you feel any difficulty in making it feel free to ask anything in the comment section.

