Introduction
Have you ever learned about breathalyzer devices? They are the devices that estimate the alcohol taken by a person. Mainly, helps to warn drunk drivers to avoid accidents. Thus, these breathalyzer devices use an Alcohol sensor. Certainly, the MQ3 sensor. Basically, It’s a metal oxide semiconductor sensor, also advertised as a chemiresistor. Because it works with the change of the resistance. Hence, it senses the alcohol concentration by voltage dividing the network. So, In this tutorial, we are going to make an “Arduino Alcohol Detector”.
How MQ3 Sensor Works?
They made the tabular sensing part of the sensor of aluminum oxide which has a coating of tin dioxide(SnO2). When this layer of SnO2 is heated at a high temperature, oxygen gets adsorbed at the surface. So, when there is no alcohol, the electrons from the conduction band of SnO2 get attracted towards the oxygen. Thus, this forms the depletion layer below the surface of the SnO2. Hence, worked as a potential barrier that allows no current to flow.
When the layer senses the alcohol, oxygen reacts with the alcohol, and the density of adsorbed oxygen gets decreases. This reduces the potential barrier and electrons are allowed to release into SnO2. As a result, the current starts to flow in a sensor.

Specification of MQ3 Sensor
- The operating voltage of the sensor is 5V.
- It consumes a current of 150 mA.
- It can detect the concentration of alcohol of about 0.05-10mg/L.
- The operating temperature range of the sensor is from 14 to 122 degrees Fahrenheit.
- The sensor requires a load resistance of 220K.
Features of MQ3 Sensor
- The MQ3 sensor belongs to the semiconductor sensor type.
- The sensor is compatible and can be interfaced with almost all microcontrollers.
- it has a low-power standby mode.
- the module has a great sensitivity for alcohol gas.
- MQ3 sensor requires the drive circuit.
- It has an easy SIP header interface.
- The sensor has a good durability rate.
- The module sensor is inexpensive and affordable.
Arduino Pin Configuration
- Power Pins: There are power pin connectors for 3.3V or 5V and two ground pins. If you want your Arduino to connect with the external circuit to power that circuit, use the power pin that you need. Further, there are also two ground pins and a Reset pin available there.
- TX and RX pins. You can use these pins if you want to send or receive the data wirelessly. For example, you may use this with a GPS module, Bluetooth module, etc.
- Digital I/O pins: Pin 2 from 13 are the digital input-output pins. While coding on IDE you need to define which to use as input and which to use as output. The pins having tilde (~) sign shows that it may use them to the output PWM square waves ( to control the speed, etc). So there are 14 input/output pins including TX and RX pins and 6 of them utilized for Pulse width modulation.
- Analog input pins: There are 6 analog pins available from A0 to A5. Usually, use to measure continuous voltages from 0V to 5V.
Hardware Required
| S.no | Components | Qty |
|---|---|---|
| 1 | Arduino UNO | 1 |
| 2 | USB Cable Type A to B | 1 |
| 3 | MQ 3 Gas sensor | 1 |
| 4 | Resistor 10KΩ | 1 |
| 5 | Jumper Wires | – |
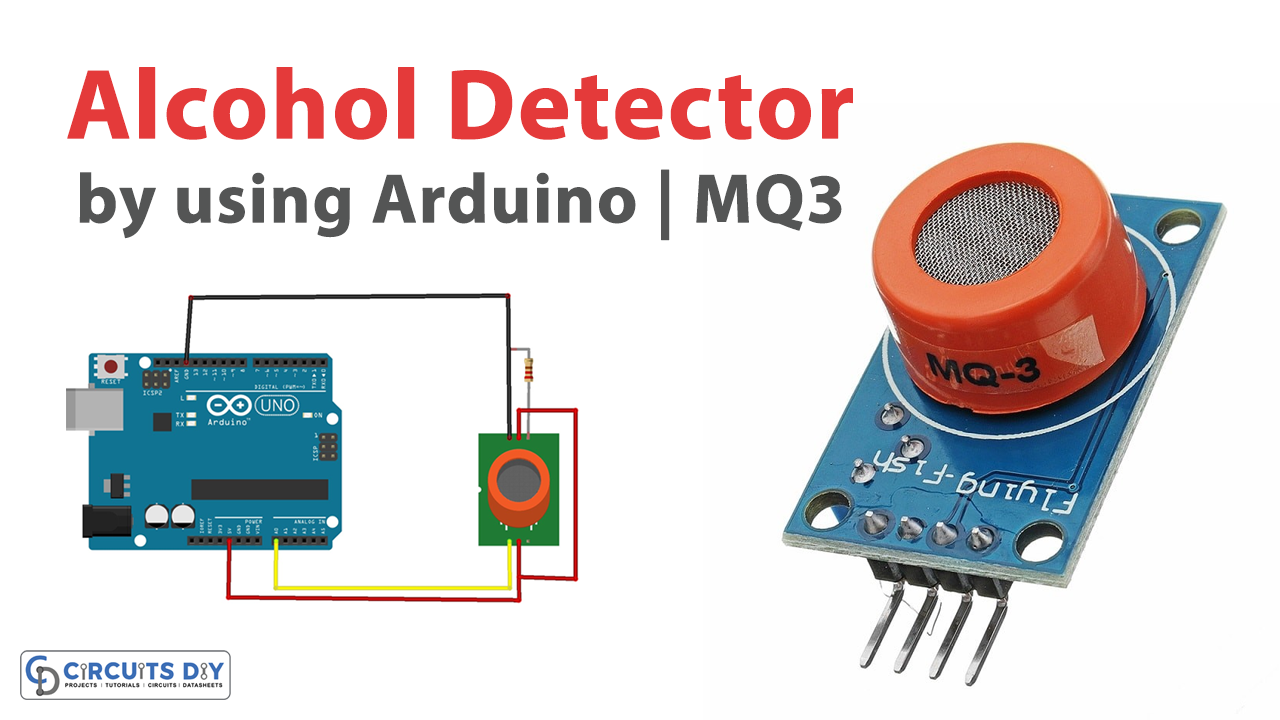
Circuit Diagram

Connection Table
| Arduino | Module / Sensor |
|---|---|
| GND | GND, H2, B2 |
| A0 | B1 |
| 5V | A1, A2, H1 |
Arduino Code
int mq3_analogPin = A0; // connected to the output pin of MQ3

void setup(){
Serial.begin(9600); // open serial at 9600 bps
}

void loop()
{
// give ample warmup time for readings to stabilize

int mq3_value = analogRead(mq3_analogPin);
Serial.println(mq3_value);

delay(100); //Just here to slow down the output.
}
Working Explanation
To interface the MQ3 Alcohol Sensor with Arduino, follow the above circuit diagram and connect the circuit accordingly. After that, write the above-described code in your Arduino IDE and upload that code in Arduino UNO. Now, open the serial monitor and observe the readings. Hence, you can measure the alcoholic concentration steadily through this device.
Code Explanation
- First, define the analog Arduino pin that is connected with the output pin of a sensor.
- In the void setup, Initialize the serial monitor.
- In the void loop, read the values coming from the sensor by using function analogRead( ). Print sensor value by using Serial.print( ). Provide some delay to get the next reading.
Application and Uses
- Breathalyzers.
- Portable alcohol detectors.
- Environmental sensing devices
- Monitoring devices, etc