Introduction
We’ve all heard of a barometer, which is used to monitor air pressure as it fluctuates with distance above or below sea level. We have actually also used that in our previous projects. Servo motors have also been utilized in our numerous projects. Let’s put them together to build this new circuit called Arduino Servo Barometer with BMP085 Sensor
It will be a servo control system in which the position of the servo shaft is decided by the weight of the force sensor.
What is Arduino Servo Barometer?
Arduino Servo Barometer is a device that controls servo motors by measuring the pressure values coming from the barometer.
Hardware Components
You will require the following hardware for Arduino Servo Barometer with BMP085 Sensor.
| S.no | Component | Value | Qty |
|---|---|---|---|
| 1. | Arduino UNO | – | 1 |
| 2. | Air Pressure Sensor | BMP085 | 1 |
| 3. | Servo Motor | SG90 | 1 |
| 4. | Breadboard | – | 1 |
| 5. | Jumper Wires | – | 1 |
Steps Making Servo Barometer
This Arduino Servo Barometer circuit uses only a few components. All of the features are listed in the hardware section above. Once you have them, proceed as follows:
Schematic
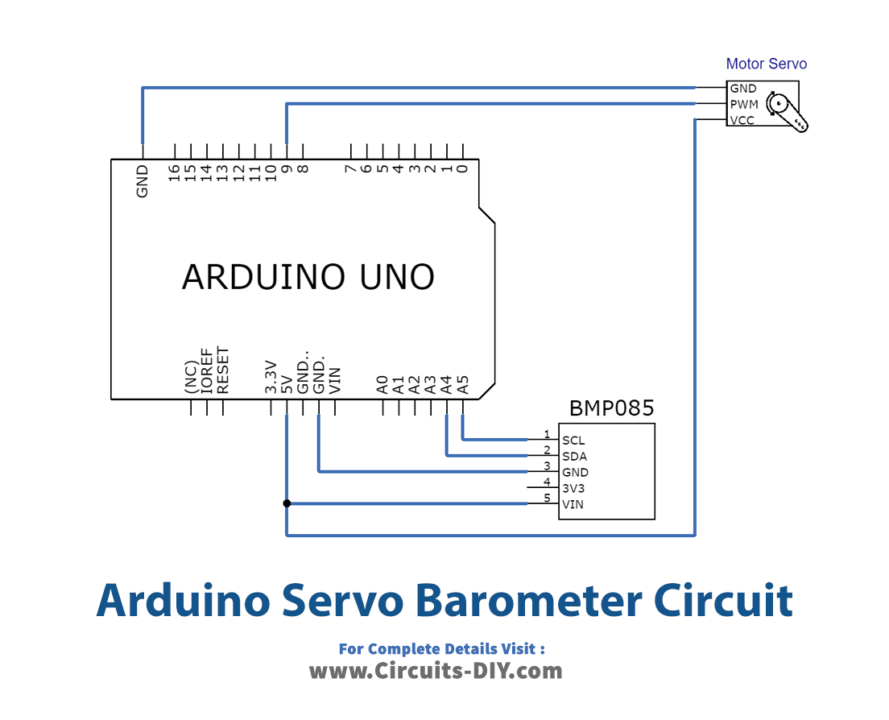
Make connections according to the circuit diagram given below.
Wiring / Connections
| Arduino | Pressure Sensor | Servo Motor |
|---|---|---|
| 5V | VCC | Red wire |
| GND | GND | Black wire |
| A4 | SDA | |
| A5 | SCL | |
| D9 | Yellow wire |
Installing Arduino IDE
First, you need to install Arduino IDE Software from its official website Arduino. Here is a simple step-by-step guide on “How to install Arduino IDE“.
Installing Libraries
Before you start uploading a code, download and unzip the following libraries at /Progam Files(x86)/Arduino/Libraries (default), to use the sensor with the Arduino board. Here is a simple step-by-step guide on “How to Add Libraries in Arduino IDE“.
Code
Now copy the following code and upload it to Arduino IDE Software.
#include <Wire.h>
#include <Servo.h>
#include <Adafruit_BMP085.h>

Adafruit_BMP085 mySensor;  // create sensor object called mySensor

float pressure;
Servo barServo;


void setup()
{

     barServo.attach(9);
     mySensor.begin();   //initialize mySensor

}

void loop()
{

pressure=mySensor.readPressure(); //Read Pressure

if (pressure < 90135) pressure = 90135;
else if (pressure > 95653) pressure = 95653;

int press = 2450 - (int) (( pressure - 90135) / 3.06);
barServo.writeMicroseconds(press);
delay(50);
}
Let’s Test It
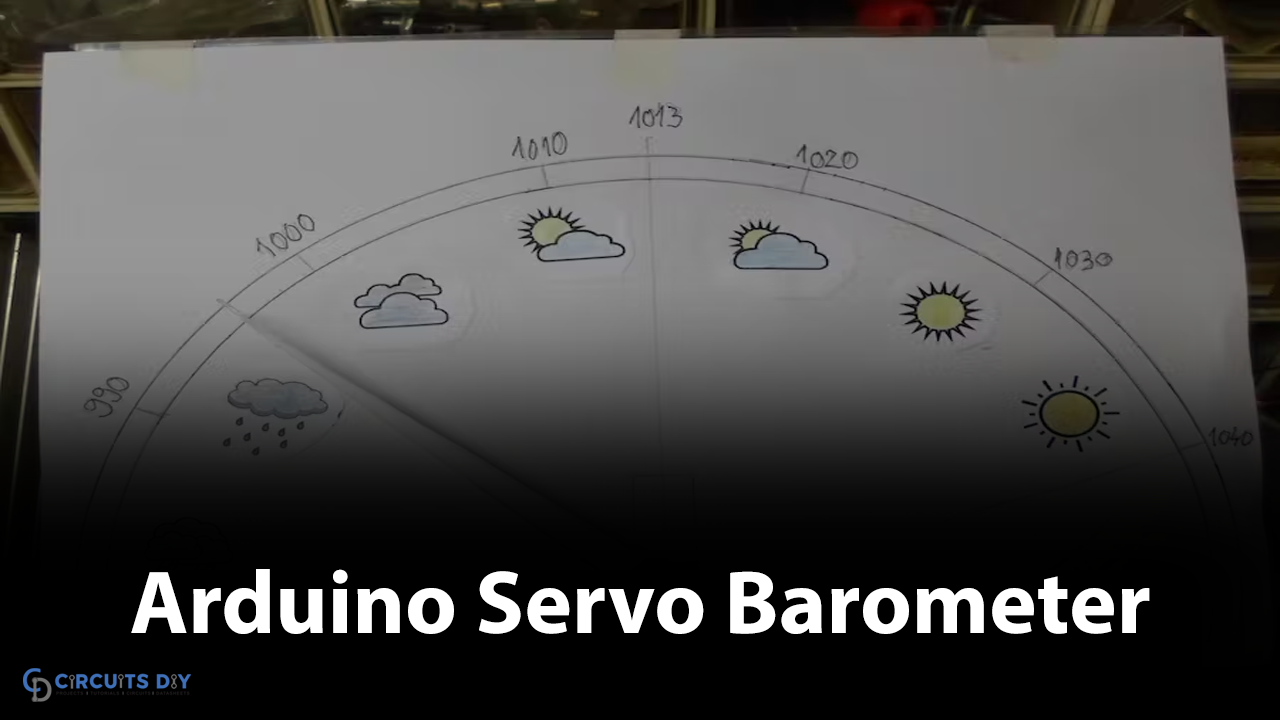
It’s now time to test the circuit, once you upload the code in Arduino, you will observe the servo shaft moving according to the measured pressure by the barometer sensor.
Working Explanation
- We first include libraries to communicate with the barometer sensor and servo motors.
- Then we create a barometer sensor object called mySensor.
- The we define two variables
- Pressure to store pressure values further in the code
- barServo for servo motor readings
- In the void setup, we initialize the servo motor
- In the void loop, we give the function mySensor.readPressure() to read the value coming from the sensor and store that value in variable Pressure. and then we further store new Pressure values by giving the condition. The variable press is then calculated using the Pressure value. writeMicroseconds () rites a value in microseconds (us) to the servo motor.
Applications
- It can be used in various appliances that employ servo motors.
- To control servo appliances through pressure.
Conclusion
We hope you have found this Arduino Servo Barometer with BMP085 Sensor Circuit very useful. If you feel any difficulty in making it feel free to ask anything in the comment section.