Introduction
Consider yourself fortunate if you have never had to recover from a fire. However, one of the most sensible steps you can do to reduce your fire risk is to install a fire alarm. Because fire alarm systems have additional useful advantages. Preventing lives and property, for instance, or occasionally cutting down on recovery time. Although there are several advantages to installing a fire alarm, however, the focus of this article is on the process of creating the alarm. In this tutorial, we will make a DIY Arduino Fire Alarm System At Home
The circuit is easy to build and requires fewer steps and little knowledge of Arduino programming. Hence before starting it is necessary to know what we mean by fire alarm systems at home.
What is Fire Alarm System?
Fire alarms, which are sometimes also known as smoke alarms, are devices that detect fire, smoke, and heat and emit a warning signal. They can be attached to the ceiling or a wall and give you more time to leave that place. Without a fire alarm installed in your house, you may not realize a fire has started, which would put your life in danger.
Hardware Components
You will require the following hardware for Fire Alarm System.
| S.no | Component | Value | Qty |
|---|---|---|---|
| 1. | Arduino UNO | – | 1 |
| 2. | Flame Sensor | – | 1 |
| 3. | Buzzer | – | 1 |
| 4. | Breadboard | – | 1 |
| 5. | Jumper Wires | – | 1 |
Steps for Making Fire Alarm System At Home
See the above-given table to get the required components. Once you have them all; follow the given steps:
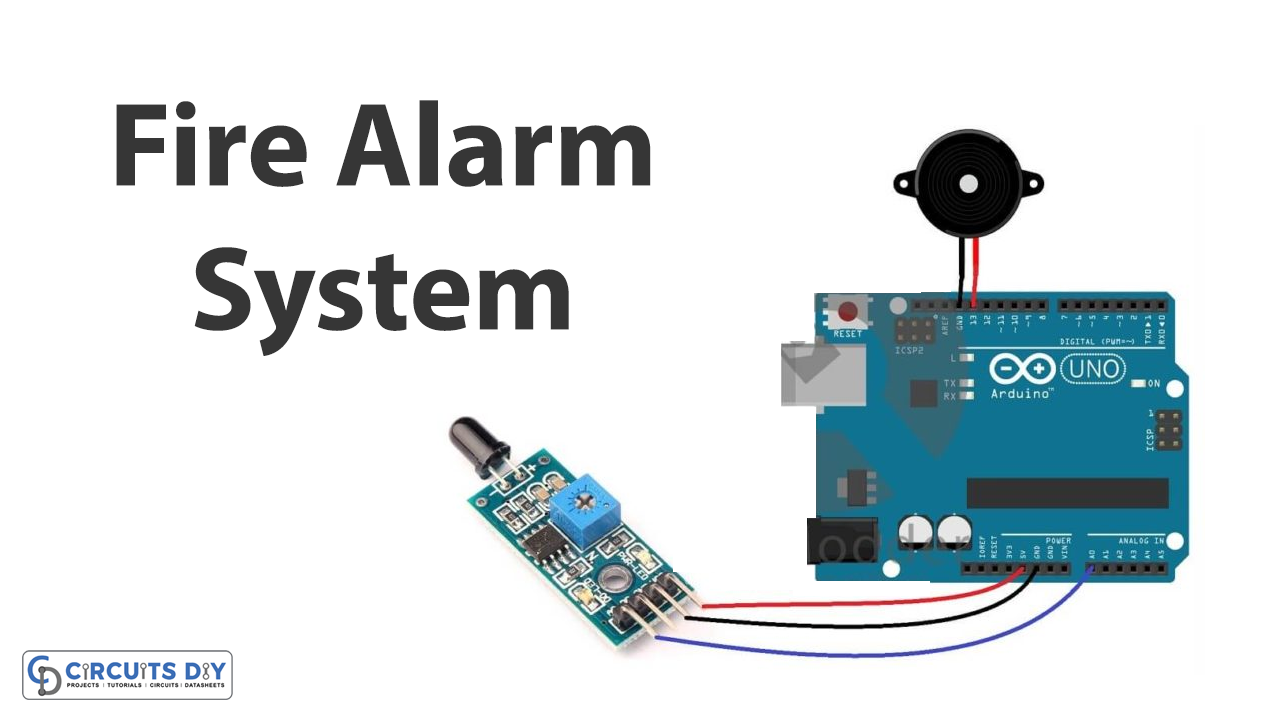
Schematic
Make connections according to the circuit diagram given below.

Wiring / Connections
| Arduino | Flame Sensor | Buzzer |
|---|---|---|
| 5V | VCC | |
| GND | GND | -ve |
| D2 | D0 | |
| D13 | +ve |
Installing Arduino IDE
First, you need to install Arduino IDE Software from its official website Arduino. Here is a simple step-by-step guide on “How to install Arduino IDE“.
Code
Now copy the following code and upload it to Arduino IDE Software.
int Buzzer = 13; // Use buzzer for alert
int FlamePin = 2; // This is for input pin
int Flame = HIGH; // HIGH when FLAME Exposed

void setup() {
 pinMode(Buzzer, OUTPUT);
 pinMode(FlamePin, INPUT);
 Serial.begin(9600);

}

void loop() {
 Flame = digitalRead(FlamePin);
 if (Flame== HIGH)
 {
 Serial.println("HIGH FLAME");
 digitalWrite(Buzzer, HIGH);
 }
 else
 {
 Serial.println("No flame");
 digitalWrite(Buzzer, LOW);
 }
}
Let’s Test It
It’s now time to test the circuit! Once you power up the Arduino and open the serial monitor you would see the message “No flame”. Now if you take the circuit where there is smoke or fire, the buzzer would start beeping and you would see the message “HIGH FLAME” on the serial monitor
Working Explanation
- First, we define and name the Arduino pins that are connected to the circuit. For example; we name pin 13 as Buzzer because it is connected to the buzzer. Pin 2 is connected to the flame sensor so we name it Flame pin. Then we define the variable named flame and make it high for when the flame is exposed.
- In the void setup, we declare the status of defined pins; i.e, input or output. Then we initialize the serial monitor.
- In the void setup, we first give the function to read the values coming from the sensor. Then we give the condition that if there is flame or fire, the serial monitor would print “HIGH FLAME” and the buzzer would beep; otherwise, the serial monitor prints “No flame” and the buzzer makes no sound
Applications
- Fire detection systems
- Home and office automation
- Industrial fire alarms; etc
Conclusion.
We hope you have found this DIY Arduino Fire Alarm System At Home Circuit very useful. If you feel any difficulty in making it feel free to ask anything in the comment section.