Introduction
In the beverages, food, and manufacturing industry, color detection is an unavoidable factor. Also, the clothing manufacturing industry uses color detection machines to detect the color of the cloth. But, many machines use expensive modules and sensors which increase the manufacturing cost. However, there are sensors like TCS230 that detect some basic or fundamental colors like red, blue, and green at very promising prices.
Thus, color detection systems are widely used in the food, automotive, medical industries. Mostly, color sensors are used to detect RGB colors. Also, These kinds of sensors used a filter to ignore the unwanted Infrared and ultraviolet lights. These types of sensors also have a light-to-frequency converter. Since the sensors are light and small, therefore easy to handle. So, In this tutorial, we are going to interface “TCS230/TCS3200 Color Sensor with Arduino UNO”.
How Color Sensor Works
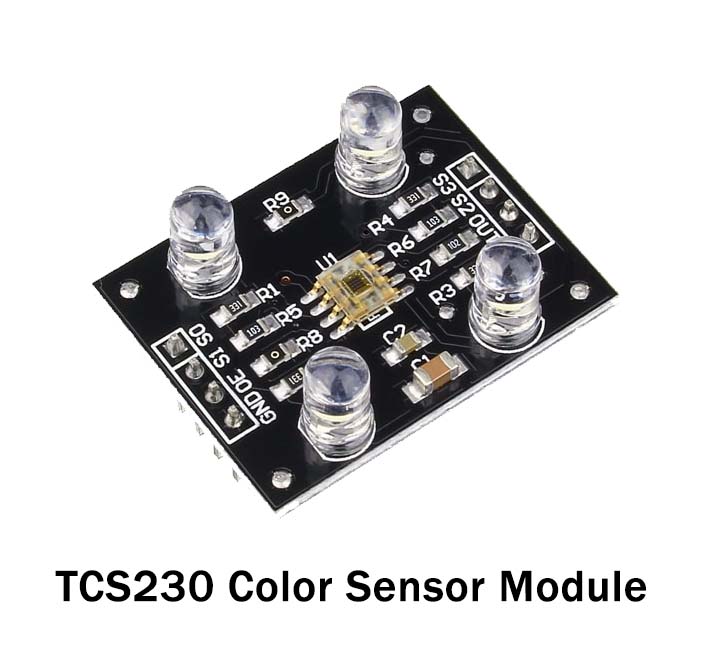
The module sensor has the panel having grids. A single pixel is the mixture of red, blue, green, and one clear filter, known as Bayers Pattern. Each filter passes one light to the photodiode array that exists underneath of Bayers Filter. This light strikes an array of photodiodes that determines the intensity of light. By measuring the relative intensity, the color is measured. In other words, Color sensors have a white light emitter inside. This emitter is there to illuminate the surface. There are three filters present in the sensor, having wavelength sensitivities at 450nm, 540nm, and 580nm. Hence, it enables the calculation of the wavelength of blue, green, and red colors. Essentially, it’s a photoelectric sensor that emits light from the transmitter and then senses the light from the object through a receiver.
Specifications about TCS230/TCS3200
- The operation voltage range of the sensor about 3 to 5V
- Dimension of sensor is 3cm×2.7cm
- The sensor has four communication interface pins
- The sensor easily communicates to the microcontroller
Hardware Required
| S.no | Component | Value | Qty |
|---|---|---|---|
| 1. | Arduino | UNO | 1 |
| 2. | USB Cable Type A to B | – | 1 |
| 3. | Jumper Wires | – | – |
| 4. | Color Sensor | TCS230 TCS3200 | 1 |
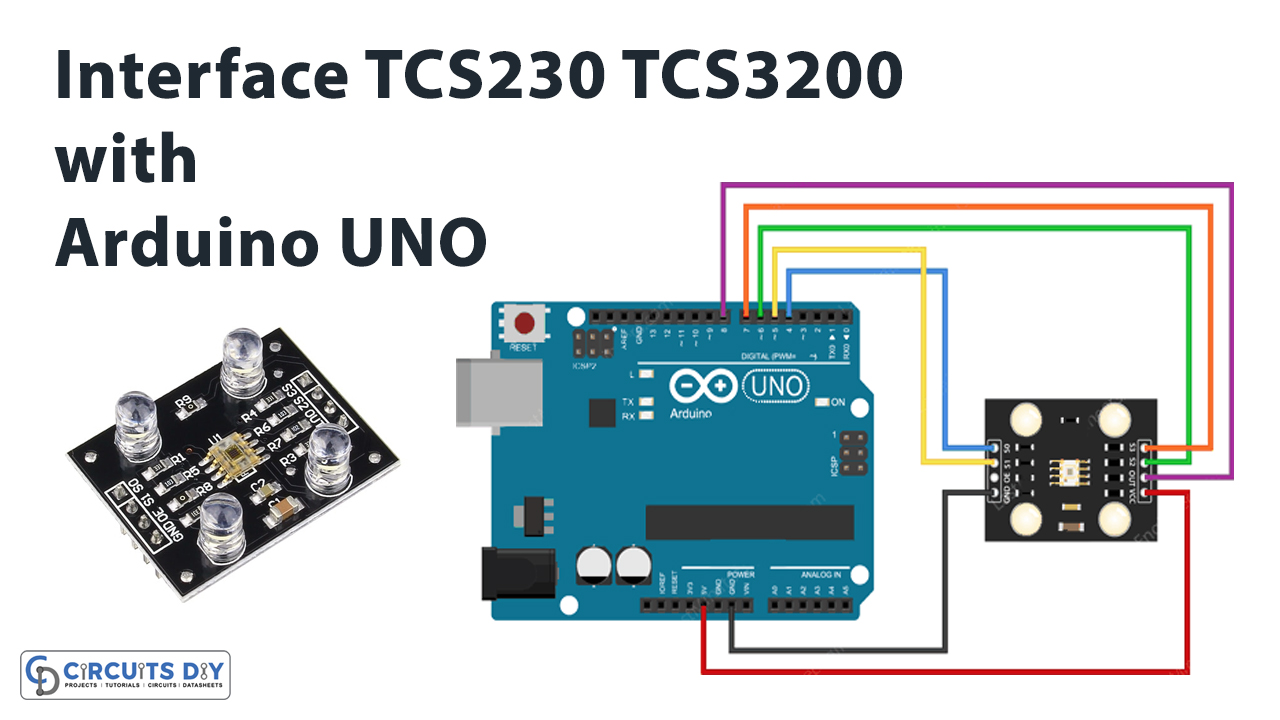
Circuit Diagram

Connection Table
| Arduino | TCS230TCS3200 Color Sensor |
|---|---|
| GND | GND |
| – | OE |
| D5 | S1 |
| D4 | S0 |
| D7 | S3 |
| D6 | S2 |
| D8 | OUT |
| 5V | VCC |
Arduino Code
// Define color sensor pins
#define S0 4
#define S1 5
#define S2 6
#define S3 7
#define sensorOut 8

// Calibration Values
// *Get these from Calibration Sketch
int redMin = 0; // Red minimum value
int redMax = 0; // Red maximum value
int greenMin = 0; // Green minimum value
int greenMax = 0; // Green maximum value
int blueMin = 0; // Blue minimum value
int blueMax = 0; // Blue maximum value

// Variables for Color Pulse Width Measurements
int redPW = 0;
int greenPW = 0;
int bluePW = 0;

// Variables for final Color values
int redValue;
int greenValue;
int blueValue;

void setup() {
	// Set S0 - S3 as outputs
	pinMode(S0, OUTPUT);
	pinMode(S1, OUTPUT);
	pinMode(S2, OUTPUT);
	pinMode(S3, OUTPUT);

	// Set Sensor output as input
	pinMode(sensorOut, INPUT);

	// Set Frequency scaling to 20%
	digitalWrite(S0,HIGH);
	digitalWrite(S1,LOW);

	// Setup Serial Monitor
	Serial.begin(9600);
}

void loop() {
	// Read Red value
	redPW = getRedPW();
	// Map to value from 0-255
	redValue = map(redPW, redMin,redMax,255,0);
	// Delay to stabilize sensor
	delay(200);

	// Read Green value
	greenPW = getGreenPW();
	// Map to value from 0-255
	greenValue = map(greenPW, greenMin,greenMax,255,0);
	// Delay to stabilize sensor
	delay(200);

	// Read Blue value
	bluePW = getBluePW();
	// Map to value from 0-255
	blueValue = map(bluePW, blueMin,blueMax,255,0);
	// Delay to stabilize sensor
	delay(200);

	// Print output to Serial Monitor
	Serial.print("Red = ");
	Serial.print(redValue);
	Serial.print(" - Green = ");
	Serial.print(greenValue);
	Serial.print(" - Blue = ");
	Serial.println(blueValue);
}


// Function to read Red Pulse Widths
int getRedPW() {
	// Set sensor to read Red only
	digitalWrite(S2,LOW);
	digitalWrite(S3,LOW);
	// Define integer to represent Pulse Width
	int PW;
	// Read the output Pulse Width
	PW = pulseIn(sensorOut, LOW);
	// Return the value
	return PW;
}

// Function to read Green Pulse Widths
int getGreenPW() {
	// Set sensor to read Green only
	digitalWrite(S2,HIGH);
	digitalWrite(S3,HIGH);
	// Define integer to represent Pulse Width
	int PW;
	// Read the output Pulse Width
	PW = pulseIn(sensorOut, LOW);
	// Return the value
	return PW;
}

// Function to read Blue Pulse Widths
int getBluePW() {
	// Set sensor to read Blue only
	digitalWrite(S2,LOW);
	digitalWrite(S3,HIGH);
	// Define integer to represent Pulse Width
	int PW;
	// Read the output Pulse Width
	PW = pulseIn(sensorOut, LOW);
	// Return the value
	return PW;
}
Working Explanation
Connect the TCS230/TCS3200 color sensor with the Arduino according to the schematic given in this tutorial. write the code from this tutorial min your Arduino IDE. Further, upload that code. Bring red, green, or blue color in front of the sensor, and observe the pulse width readings on the serial monitor.
Code Explanation
- First, define the sensor plans that are connected with the Arduino. Then define the variables for measurement of the pulse width of red, green, and blue colors.
- In the void setup, define the pin modes of the sensor that is connected with the Arduino. Use digital write to set the width scaling to 20% through tye pins S0 and S1. After that, declare that the sensor output is the input of an Arduino. Initialize the serial monitor by using Serial. begin( ) command.
- In the void loop, call the functions to get the pulse width. For instance, call getRedPW to get the pulse width of red color. For this purpose, set S2 and S3 as low. define the integer PW which represents the pulse width. Use pulseIn function to estimate the readings from Arduino Return the value to the variable PW.
In the same vein, call functions to read green and blue colors.
Application and Use
- In the automotive, textile, food industry.
- Automation and pharmaceutical industry.
- Also, Used in printing devices.