Contents
hide
Hi in this tutorial

Hardware Required
The following components are required to make LED Dimmer Circuit
| S.NO | Component | Value | Qty |
|---|---|---|---|
| 1. | IC | NE555 Timer | 1 |
| 2. | Battery | 9V | 1 |
| 3. | Breadboard | – | 1 |
| 4 | Jumper Wires | – | 1 |
| 5 | Resistor | 1K, 220-ohm | 1, 1 |
| 7 | Variable Resistor | 10k | 1 |
| 8 | Ceramic Capacitor | 100nf | 2 |
| 9 | LED | – | 1 |
| 10 | Diode | 1N4148 | 2 |
555 Timer Pinout
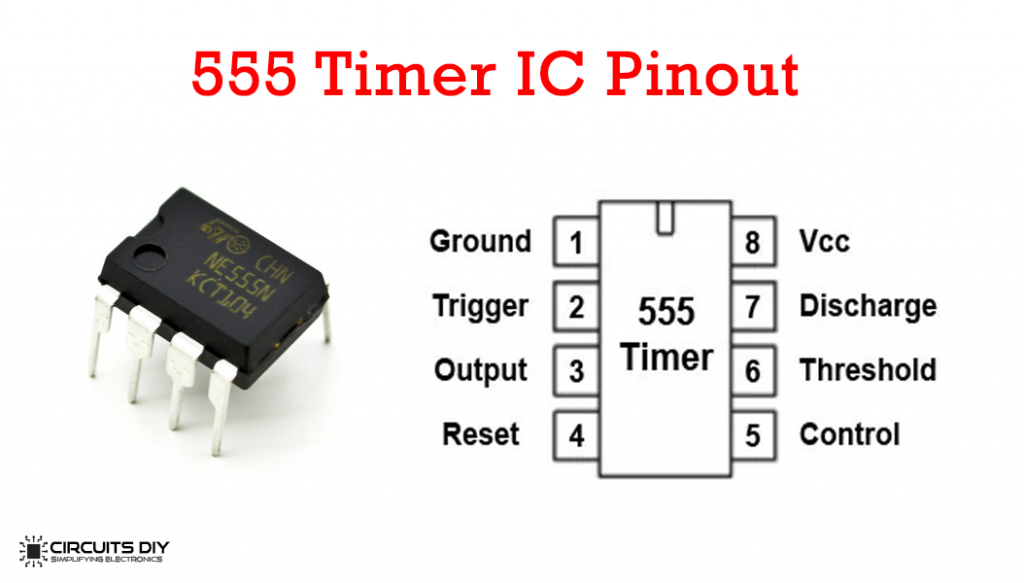
For a detailed description of pinout, dimension features, and specifications download the datasheet of 555 Timer
LED Dimmer Circuit

Useful Steps
Follow all steps carefully from the video tutorial at the end of this post (Highly Recommended).
- STEP # 1 ( Connect IC )
- Connect 555 timer IC on the
breadboard - STEP # 2 ( Make power connections )
- Pin 8 of 555 Timer – To VCC of Battery
Pin 1 of 555 Timer – To GND of Battery - STEP # 3 ( Connect Resistor )
- Connect wire BTW pin 2 and pin 6
Connect pin 4 to VCC - STEP # 4 ( Connect Capacitor )
- Connect 100nf
ceramic capacitor on pin 5
Connect 100nfcer a mic capacitor on pin 6 - STEP # 5 ( Connect resistor #1 )
- Connect 1k ohm resistor pin 7
- STEP # 6 ( Connect Variable resistor )
- Connect 10k ohm variable resistor on board
- STEP # 7 ( Connect
diodes and make connections ) - Connect diode BTW right leg of the
variable resistor to pin 7
Connect diode BTW left leg of thevariable resistor to pin 7
Connect wire BTW middle leg of thevariable resistor to pin 6 - STEP # 8 ( Connect resistor and LED )
- Connect
220-ohm resistor on pin 3
Connect LED on pin 3 - STEP # 9 ( Testing )