Introduction
The HC-SR501 Pyroelectric Infrared PIR Module Motion Sensor controlled SG51R Servo Motor using an Arduino Uno is an advanced system that combines the power of motion sensing technology with precise motor control. The HCSR501 PIR Sensor detects motion by sensing changes in infrared radiation levels, and the SG51R Servo Motor can rotate to specific angles based on the input it receives. Together, these components work seamlessly to provide a highly responsive and accurate motion detection system.
The Arduino Uno microcontroller acts as the brain of the system, it reads the input from the PIR sensor and uses that information to control the movement of the servo motor. This allows the system to respond to motion in real time, making it ideal for a wide range of applications such as security systems, automation projects, and interactive displays.
Hardware Components
You will require the following hardware for Interfacing Motion Sensor Servo Motor with Arduino.
| S.no | Component | Value | Qty |
|---|---|---|---|
| 1. | Arduino UNO | – | 1 |
| 2. | USB Cable Type A to B | – | 1 |
| 3. | Motion Sensor | HC-SR501 | 1 |
| 4. | Servo Motor | – | 1 |
| 5. | Power Adapter for Arduino | 9V | 1 |
| 6. | Jumper Wires | – | 1 |
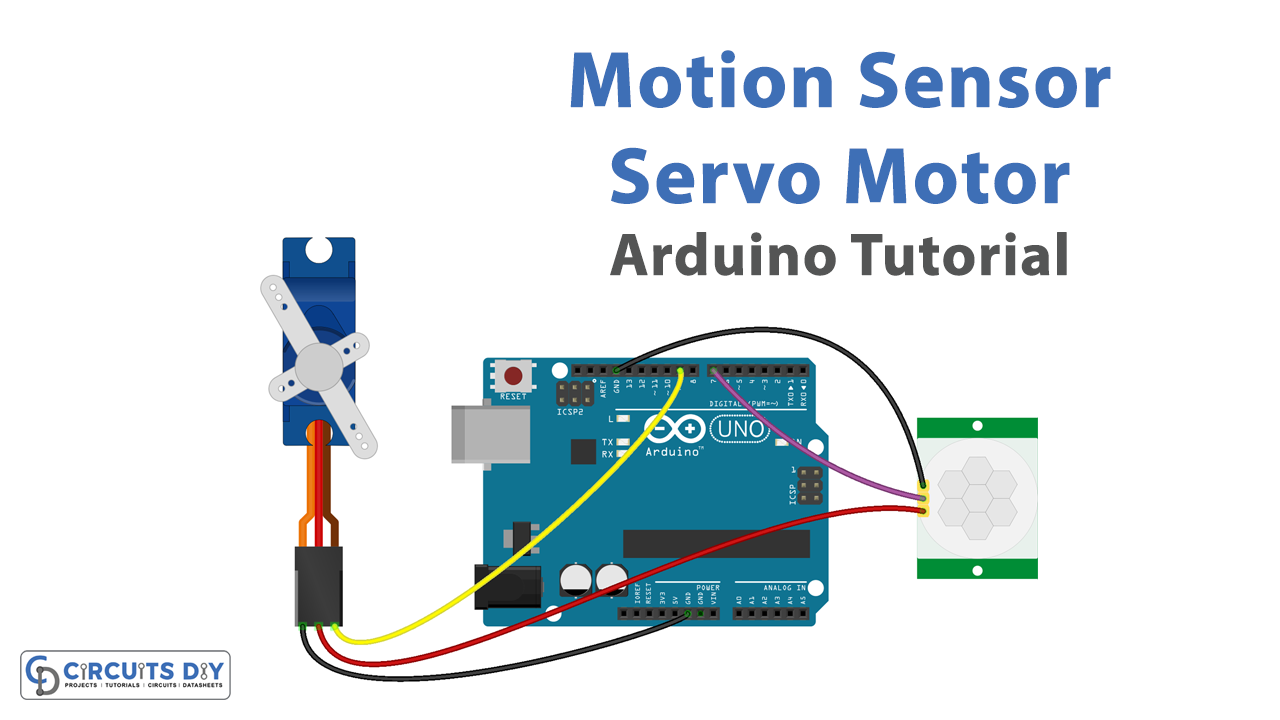
Motion Sensor Servo Motor with Arduino
- Connect the VCC pin of the PIR sensor to the 5V pin of the Arduino and the GND pin to a GND pin on the Arduino.
- Connect the OUT pin of the PIR sensor to a digital pin on the Arduino (e.g. pin 2).
- Connect the VCC pin of the servo motor to the 5V pin of the Arduino, the GND pin to a GND pin, and the signal pin to a digital pin on the Arduino (e.g. pin 9).
- In the Arduino IDE, include the Servo library by going to Sketch > Include Library > Servo.
#include <Servo.h>
- In the setup() function, declare the servo and PIR sensor pins as variables and attach the servo to the pin using the servo.attach() function.
int PIR_pin = 2;    // PIR sensor connected to digital pin 2
int servo_pin = 9;  // Servo motor connected to digital pin 9

Servo myservo;

void setup() {
  myservo.attach(servo_pin); // Attaching the servo motor to pin 9
  pinMode(PIR_pin, INPUT);   // Setting the PIR sensor as an input
  Serial.begin(9600);        // Starting serial communication
}
- In the loop() function, read the state of the PIR sensor using the digitalRead() function and store the value in a variable.
void loop() {
  int PIR_state = digitalRead(PIR_pin); // Reading the state of the PIR sensor
  // code continues below
}
- Use an if statement to check if the PIR sensor has detected motion and if it has, use the servo.write() function to rotate the servo to a specific angle (e.g. 180 degrees).
if (PIR_state == HIGH) {
    myservo.write(180);                // Rotating the servo to 180 degrees
    Serial.println("Motion detected! Servo angle: 180 degrees");
  } else {
    myservo.write(0);                  // Rotating the servo to 0 degrees
    Serial.println("No motion detected! Servo angle: 0 degrees");
  }
- Use the Serial.println() function to print the state of the PIR sensor and the angle of the servo to the serial monitor.
Serial.println("Motion detected! Servo angle: 180 degrees");
Serial.println("No motion detected! Servo angle: 0 degrees");
Schematic
Make connections according to the circuit diagram given below.
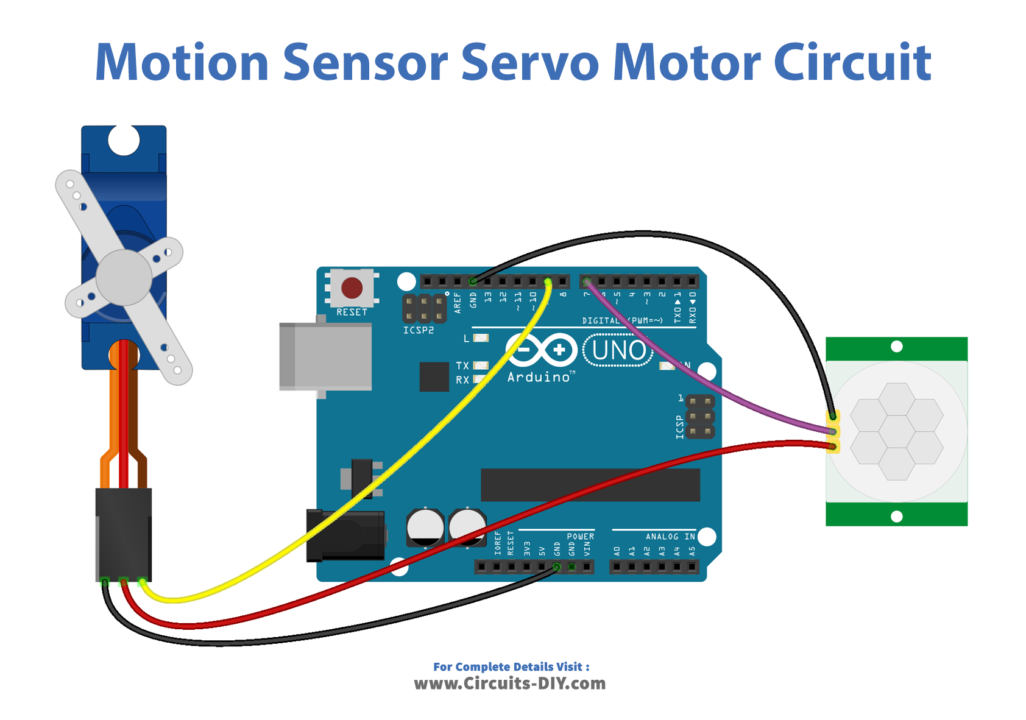
Wiring / Connections
| Arduino | Servo Motor | PIR Sensor |
|---|---|---|
| 5V | RED | VCC |
| GND | GND | GND |
| D7 | OUT | |
| D9 | YELLOW |
Installing Arduino IDE
First, you need to install Arduino IDE Software from its official website Arduino. Here is a simple step-by-step guide on “How to install Arduino IDE“.
Installing Libraries
Before you start uploading a code, download and unzip the following libraries at /Progam Files(x86)/Arduino/Libraries (default), in order to use the sensor with the Arduino board. Here is a simple step-by-step guide on “How to Add Libraries in Arduino IDE“.
Code
Now copy the following code and upload it to Arduino IDE Software.
#include <Servo.h>

// constants won't change
const int MOTION_SENSOR_PIN = 7; // Arduino pin connected to motion sensor's pin
const int SERVO_PIN         = 9; // Arduino pin connected to servo motor's pin

Servo servo; // create servo object to control a servo

// variables will change:
int angle = 0;          // the current angle of servo motor
int lastMotionState;    // the previous state of motion sensor
int currentMotionState; // the current state of motion sensor

void setup() {
  Serial.begin(9600);                // initialize serial
  pinMode(MOTION_SENSOR_PIN, INPUT); // set arduino pin to input mode
  servo.attach(SERVO_PIN);           // attaches the servo on pin 9 to the servo object

  servo.write(angle);
  currentMotionState = digitalRead(MOTION_SENSOR_PIN);
}

void loop() {
  lastMotionState    = currentMotionState;             // save the last state
  currentMotionState = digitalRead(MOTION_SENSOR_PIN); // read new state

  if (currentMotionState == LOW && lastMotionState == HIGH) { // pin state change: LOW -> HIGH
    Serial.println("Motion detected!");
    servo.write(90);
  }
  else
  if (currentMotionState == HIGH && lastMotionState == LOW) { // pin state change: HIGH -> LOW
    Serial.println("Motion stopped!");
    servo.write(0);
  }
}
Working Explanation
In the setup() function, the servo, and PIR sensor pins are declared as variables and the servo is attached to the appropriate pin using the servo.attach() function. The pinMode() function is used to set the PIR sensor as an input. And Serial.begin(9600) is used to start the serial communication.
In the loop() function, the state of the PIR sensor is read using the digitalRead() function and stored in a variable. An if statement is then used to check if the PIR sensor has detected motion. If the motion is detected, the servo.write() function is used to rotate the servo to a specific angle (e.g. 180 degrees). If no motion is detected, the servo is rotated back to its initial position (e.g. 0 degrees).
Finally, the state of the PIR sensor and the angle of the servo are printed to the serial monitor using the Serial.println() function. This allows the user to see the status of the PIR sensor and the servo motor in real time.
Applications
- Surveillance systems
- Robotics
- Automatic doors
- Security systems
- Automated curtains and blinds
- Automated pet feeders
- Smart home automation
- Automated plant watering systems
Conclusion.
We hope you have found this Motion Sensor Servo Motor Circuit very useful. If you feel any difficulty in making it feel free to ask anything in the comment section.