Introduction
Safely parking one’s automobile is among the most crucial abilities for every car driver. Previously, it was necessary to use both the side and rearview mirrors while driving for parking. However, the invention of parking sensors has made parallel or reverse parking considerably simpler nowadays. These innovations enable drivers to safely drive their cars without ever hitting them. Thus, in this article, we will make a Parking Sensor with Arduino.
Parking sensors come in two different types: ultrasonic parking sensors and electromagnetic parking sensors. We’ll concentrate mostly on ultrasonic parking sensors in this article.
What is a Parking Sensor?
Parking sensors sometimes referred to as proximity sensors, are practical and useful devices. When parking, they warn the driver of any possible obstacles. These sensors are frequently mounted on the vehicle’s rear bumper. The technology directs electromagnetic frequencies or sound waves in the direction of the car’s motion. The technology transmits signals to the back of the car when you park in reverse. Any signal that is received sounds like an alert to warn the driver of possible obstruction.
Hardware Components
You will require the following hardware for the Parking Sensor with Arduino.
| S.no | Components | Value | Qty |
|---|---|---|---|
| 1 | Arduino | UNO | 1 |
| 2 | Ultrasonic Sensor | HC-SR04 | 1 |
| 3 | Buzzer | – | 1 |
| 4 | Breadboard | – | 1 |
| 5 | Jumper Wires | – | 1 |
Get the above-mentioned components to make this Parking Sensor with Arduino. Once you get them, follow the given steps:
Schematic
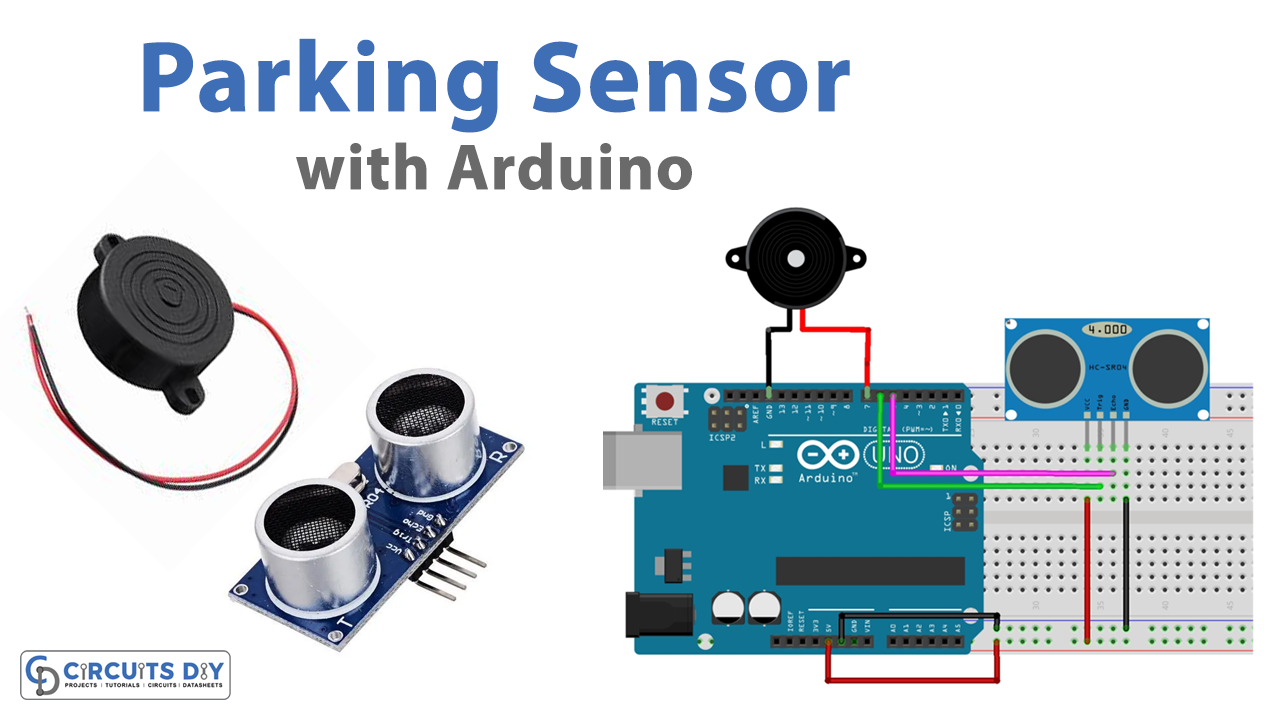
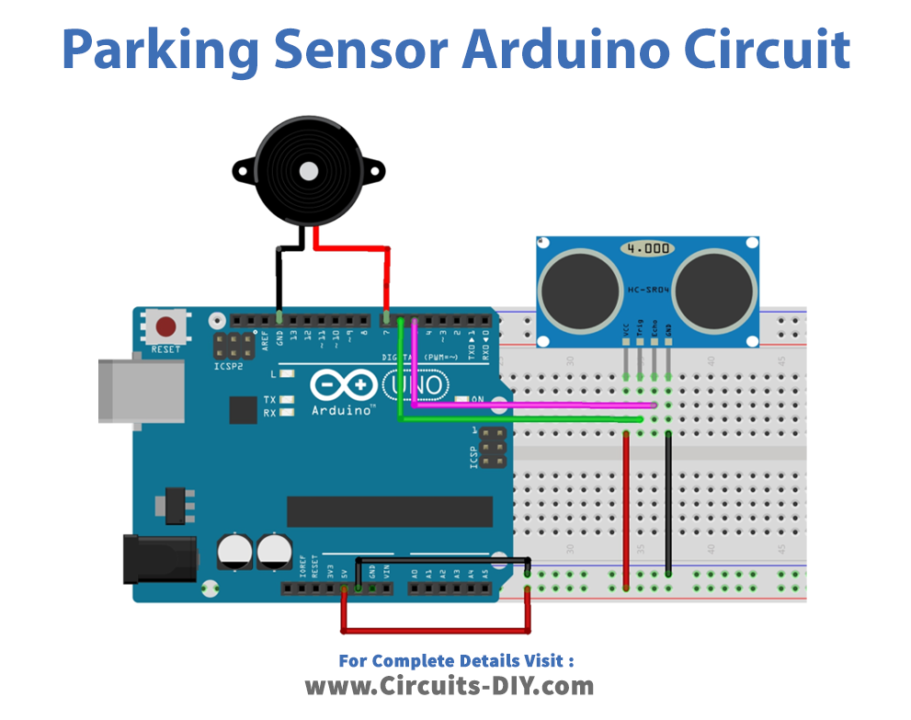
Make connections according to the circuit diagram given below.
Wiring / Connections
| Arduino | HC-SR04 | Buzzer |
|---|---|---|
| 5V | VCC | |
| GND | GND | Negative |
| D5 | Echo | |
| D6 | Trig | |
| D7 | Positive |
Installing Arduino IDE
First, you need to install Arduino IDE Software from its official website Arduino. Here is a simple step-by-step guide on “How to install Arduino IDE“.
Installing Libraries
Before you start uploading a code, download and unzip the following libraries at /Program Files(x86)/Arduino/Libraries (default) to use the sensor with the Arduino board. Here is a simple step-by-step guide on “How to Add Libraries in Arduino IDE“.
Code
Now copy the following code and upload it to Arduino IDE Software.
#include <Ultrasonic.h>
Ultrasonic ultrasonic(6,5);// 6 trig , 5 echo

const int buzzer = 7; // pin buzzer

void setup(){
 pinMode(buzzer,OUTPUT);

}

void loop(){
 int dist = ultrasonic.Ranging(CM);
if (dist < 100) {
  tone(buzzer,1000);
     delay(40);
   noTone(buzzer);
     delay(dist*4);
   }
 delay(100);
}
Let’s Test It
It’s now time to test the circuit. When you go too close to the sensor, the buzzer will eventually start to make a sound.
Working Explanation
Let’s examine the code to better comprehend the circuit:
- First, we include the library for the ultrasonic sensor to make it easy to connect to the sensor. Then we make an object of that library and declare the Arduino pins that are connected to the sensor. Since pin 6 of an Arduino is connected to the trig pin and pin 5 is connected to the echo pin. Then we define and name the Arduino pin that is connected to the buzzer.
- In the void setup, we declare the buzzer pin as the output pin.
- We then give the function to find the distance and store that value in the variable named dist. We then give the condition that if the distance is less than 100, the buzzer makes some sound, and after a while, that buzzer stops generating a tone till the distance is increased by four. A little delay is given in the end before getting another value.
Applications
- Vehicles and automobiles.
Conclusion.
We hope you have found this Parking Sensor Circuit very useful. If you feel any difficulty in making it feel free to ask anything in the comment section.