Introduction
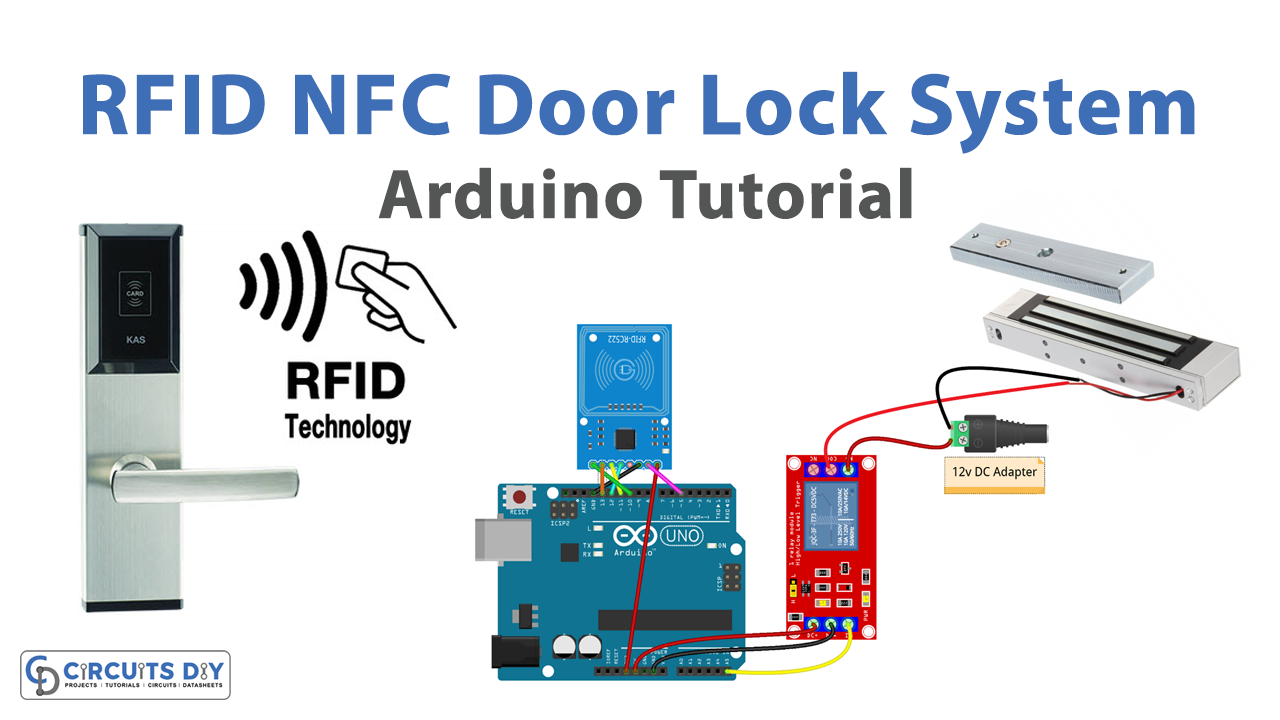
An RFID/NFC door lock system using an Arduino Uno microcontroller and an SPDT (Single Pole Double Throw) relay is an electronic security system that grants access to a door based on the UID (Unique Identifier) of an RFID/NFC tag. The system consists of an Arduino Uno microcontroller, an MFRC522 RFID/NFC reader, an SPDT relay, and a 12V DC solenoid door lock. The RFID/NFC reader reads the UID of the tag and compares it with a pre-defined UID in the code. If the UIDs match, the system triggers the SPDT relay to unlock the door for a pre-defined time period, allowing access. If the UIDs do not match, access is denied and the door remains locked.
The MRC522 is a 13.56 MHz contactless smart card reader module, commonly used in access control systems, transportation systems, and other applications where contactless communication is needed. The module operates based on the ISO/IEC 14443 Type A standard and can communicate with various types of contactless cards and tags, including MIFARE Classic, MIFARE Ultralight, NTAG203, and more.
Hardware Components
You will require the following hardware for RFID NFC Door Lock System with Arduino.
| S.no | Component | Value | Qty |
|---|---|---|---|
| 1. | Arduino UNO | – | 1 |
| 2. | USB Cable Type A to B | – | 1 |
| 3. | RFID/NFC Kit (reader + tags) | RC522 | 1 |
| 4. | Electromagnetic Lock | – | 1 |
| 5. | Relay | – | 1 |
| 6. | Power Adapter | 12V | 1 |
| 7. | DC Power Jack | – | 1 |
| 8. | Power Adapter for Arduino | 9V | 1 |
| 9. | Jumper Wires | – | 10 |
RFID NFC Door Lock System with Arduino
- First, the required libraries for the RFID and SPI interfaces are included.
#include <SPI.h>
#include <MFRC522.h>
- Then, the necessary pins for the MFRC522 RFID reader, the relay module, and the tag’s UID (Unique Identifier) are defined.
#define SS_PIN 10 // MFRC522 slave select pin
#define RST_PIN 5 // MFRC522 reset pin
#define RELAY_PIN A5 // Relay module pin

byte keyTagUID[4] = {0xFF, 0xFF, 0xFF, 0xFF}; // RFID Tag's UID
- In the
setup()function, theSerialinterface is started and the SPI and MFRC522 RFID reader are initialized.
void setup() {
  Serial.begin(9600);
  SPI.begin(); // Initialize SPI bus
  rfid.PCD_Init(); // Initialize MFRC522
  pinMode(RELAY_PIN, OUTPUT); // Initialize relay module pin as an output
  digitalWrite(RELAY_PIN, HIGH); // Lock the door
}
- In the
loop()function, the code waits for a new tag to be presented to the MFRC522 RFID reader. If a tag is detected, the unique identifier (UID) of the tag is read.
void loop() {
  if (rfid.PICC_IsNewCardPresent()) { // Check if a new tag is present
    if (rfid.PICC_ReadCardSerial()) { // Read the tag's unique identifier (UID)
- The type of tag-detected is also determined and printed to the serial monitor.
MFRC522::PICC_Type piccType = rfid.PICC_GetType(rfid.uid.sak);
Serial.print("Tag Type: ");
Serial.println(rfid.PICC_GetTypeName(piccType));
- Next, the UID of the detected tag is compared to a pre-defined tag UID to check if the detected tag is authorized to open the door.
if (rfid.uid.uidByte[0] == keyTagUID[0] &&
    rfid.uid.uidByte[1] == keyTagUID[1] &&
    rfid.uid.uidByte[2] == keyTagUID[2] &&
    rfid.uid.uidByte[3] == keyTagUID[3] ) {
- If the detected tag’s UID matches the authorized UID, the relay is triggered to unlock the door for 2 seconds.
digitalWrite(RELAY_PIN, LOW);  // Unlock the door for 2 seconds
delay(2000);
digitalWrite(RELAY_PIN, HIGH); // Lock the door
- If the detected tag’s UID does not match the authorized UID, a message is printed to the serial monitor indicating that access is denied.
else {
  Serial.println("Access denied");
}
- Finally, the PICC (Proximity Integrated Circuit Card) and PCD (Proximity Coupling Device) are halted and the encryption is stopped.
rfid.PICC_HaltA(); // Halt PICC
rfid.PCD_StopCrypto1(); // Stop encryption on PCD
Schematic
Make connections according to the circuit diagram given below.
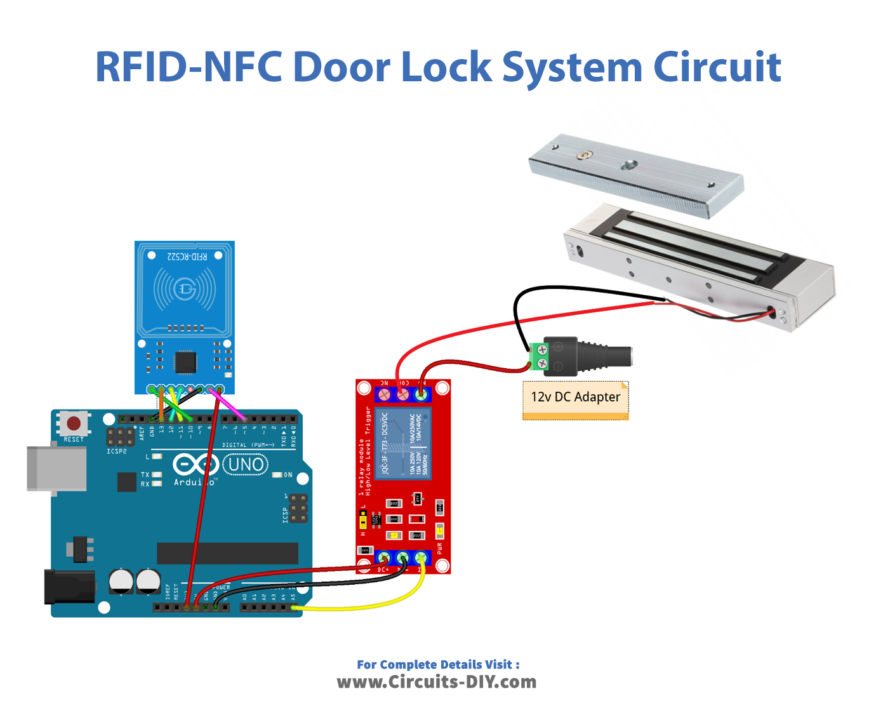
Wiring / Connections
| Arduino | Relay | RFID/NFC |
|---|---|---|
| 5V | VCC | |
| GND | GND | GND |
| A5 | INP | |
| 3V3 | VCC | |
| D10 | SS | |
| D13 | SCK | |
| D11 | MOSI | |
| D12 | MISO | |
| D5 | RST | |
Installing Arduino IDE
First, you need to install Arduino IDE Software from its official website Arduino. Here is a simple step-by-step guide on “How to install Arduino IDE“.
Installing Libraries
Before you start uploading a code, download and unzip the following libraries at /Progam Files(x86)/Arduino/Libraries (default), in order to use the sensor with the Arduino board. Here is a simple step-by-step guide on “How to Add Libraries in Arduino IDE“.
Code
Now copy the following code and upload it to Arduino IDE Software.
#include <SPI.h>
#include <MFRC522.h>

#define SS_PIN 10
#define RST_PIN 5
#define RELAY_PIN A5 // the Arduino pin connects to relay

MFRC522 rfid(SS_PIN, RST_PIN);

byte keyTagUID[4] = {0xFF, 0xFF, 0xFF, 0xFF};

void setup() {
  Serial.begin(9600);
  SPI.begin(); // init SPI bus
  rfid.PCD_Init(); // init MFRC522
  pinMode(RELAY_PIN, OUTPUT); // initialize pin as an output.
  digitalWrite(RELAY_PIN, HIGH); // lock the door

  Serial.println("Tap RFID/NFC Tag on reader");
}

void loop() {
  if (rfid.PICC_IsNewCardPresent()) { // new tag is available
    if (rfid.PICC_ReadCardSerial()) { // NUID has been readed
      MFRC522::PICC_Type piccType = rfid.PICC_GetType(rfid.uid.sak);

      if (rfid.uid.uidByte[0] == keyTagUID[0] &&
          rfid.uid.uidByte[1] == keyTagUID[1] &&
          rfid.uid.uidByte[2] == keyTagUID[2] &&
          rfid.uid.uidByte[3] == keyTagUID[3] ) {
        Serial.println("Access is granted");
        digitalWrite(RELAY_PIN, LOW);  // unlock the door for 2 seconds
        delay(2000);
        digitalWrite(RELAY_PIN, HIGH); // lock the door
      }
      else
      {
        Serial.print("Access denied for user with UID:");
        for (int i = 0; i < rfid.uid.size; i++) {
          Serial.print(rfid.uid.uidByte[i] < 0x10 ? " 0" : " ");
          Serial.print(rfid.uid.uidByte[i], HEX);
        }
        Serial.println();
      }

      rfid.PICC_HaltA(); // halt PICC
      rfid.PCD_StopCrypto1(); // stop encryption on PCD
    }
  }
}
Working Explanation
The code initializes the necessary pins and sets the key tag UID. In the setup function, it sets up the serial communication and initializes the MFRC522 library, as well as the relay pin. The relay pin is initially set to high, which locks the door.
In the loop function, the system checks if a new tag has been detected by the RFID reader. If a tag is present, it reads the UID of the tag and compares it to the pre-defined key tag UID. If the UIDs match, the system unlocks the door by setting the relay pin to low for 2 seconds, allowing the door to open. If the UIDs do not match, the system denies access and logs the attempted user’s UID in the serial monitor. Finally, the code uses the MFRC522::PICC_HaltA() and rfid.PCD_StopCrypto1() functions to halt the communication between the tag and the reader.
Applications
- Contactless payment systems
- Inventory management systems
- Customer loyalty programs
- Animal identification and tracking systems
- Race timing systems
- Toll collection systems
- Parking management systems
- Asset tracking systems
- Sports timing systems
- Event ticketing and registration
Conclusion.
We hope you have found this RFID NFC Door Lock System Circuit very useful. If you feel any difficulty in making it feel free to ask anything in the comment section.