Introduction
The integration of a DHT11 temperature and humidity sensor with a 16×2 LCD display presents a unique opportunity to explore the realm of IoT and home automation. This project brings together the functionality of a sensor that accurately measures the temperature and humidity of the environment and a compact and easily readable display module. By utilizing an Arduino UNO microcontroller, the data obtained from the DHT11 sensor can be seamlessly processed and displayed on the 16×2 LCD screen. The result is a dynamic system that provides real-time information about the temperature and humidity levels, allowing for a deeper understanding of the surrounding environment.
The DHT11 is a basic, low-cost digital temperature and humidity sensor. It measures both temperature and humidity in the surrounding environment and outputs this data as a digital signal. The DHT11 consists of a capacitive humidity sensor and a thermistor to measure the temperature. The sensor provides a simple, one-wire interface for communication with microcontrollers, making it easy to integrate into various applications.
Hardware Components
You will require the following hardware for Temperature Humidity Sensor.
| S.no | Component | Value | Qty |
|---|---|---|---|
| 1. | Arduino UNO | – | 1 |
| 2. | USB Cable Type A to B | – | 1 |
| 3. | LED | I2C | 1 |
| 4. | Temperature and Humidity Sensor | DHT11 | 1 |
| 5. | Power Adapter for Arduino | 9V | 1 |
| 6. | Jumper Wires | – | 1 |
Temperature Humidity Sensor LCD with Arduino
- Start by including the necessary libraries:
#include <Wire.h>
#include <LiquidCrystal_I2C.h>
#include <DHT.h>
Here, we are including the libraries for the I2C communication with the LCD module, the LiquidCrystal library, and the DHT library.
- Initialize the sensor and the LCD module:
#define DHTPIN 2
#define DHTTYPE DHT11
DHT dht(DHTPIN, DHTTYPE);
LiquidCrystal_I2C lcd(0x27,16,2);
Here, we are defining the type and pin of the DHT11 sensor and initialize the DHT11 sensor. Also, we are initializing the I2C LCD module with the address 0x27, 16 columns, and 2 rows.
- In the setup() function:
void setup() {
  lcd.begin();
  lcd.backlight();
  dht.begin();
  delay(1000);
}
Here, we are initializing the LCD module and enabling its backlight. We are also initializing the DHT11 sensor and adding a delay of 1000ms.
- In the loop() function:
void loop() {
  float h = dht.readHumidity();
  float t = dht.readTemperature();
  lcd.setCursor(0,0);
  lcd.print("Temp: ");
  lcd.print(t);
  lcd.print("C");
  lcd.setCursor(0,1);
  lcd.print("Hum: ");
  lcd.print(h);
  lcd.print("%");
  delay(1000);
}
Here, we are reading the temperature and humidity values from the DHT11 sensor and storing them in variables t and h. We are then printing the values on the LCD display. The values are printed on the first line of the LCD display with the label “Temp: ” and on the second line with the label “Hum: “. The values are displayed in Celsius and percent. We are adding a delay of 1000ms.
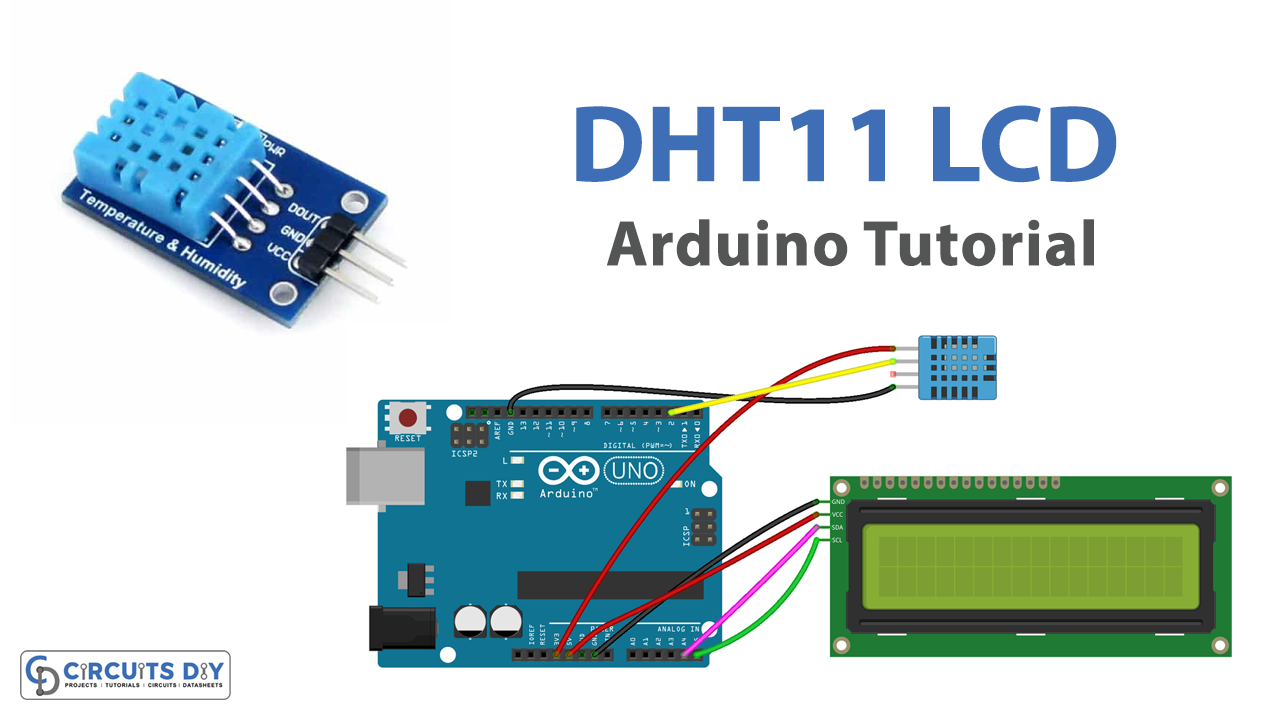
Schematic
Make connections according to the circuit diagram given below.
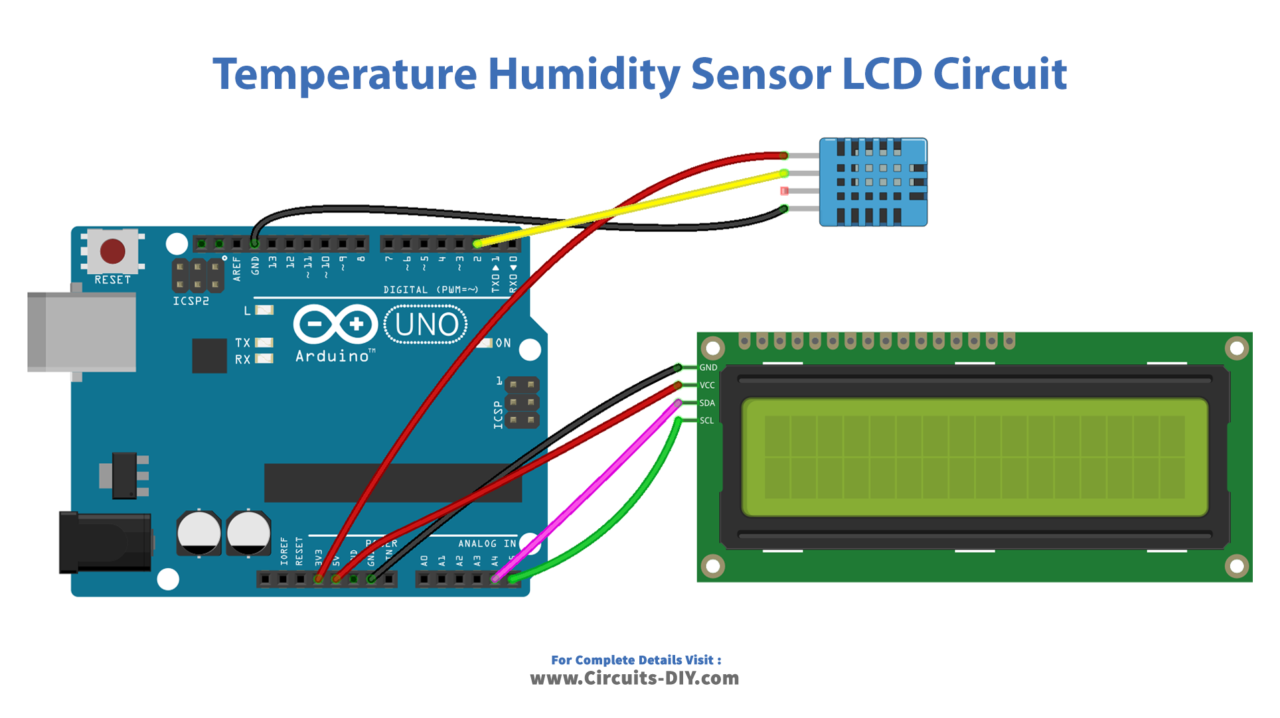
Wiring / Connections
| Arduino | Humidity Sensor | LCD |
|---|---|---|
| 3V3 | VCC | |
| GND | GND | GND |
| D2 | DATA | |
| 5V | VCC | |
| A4 | SDA | |
| A5 | SCL |
Installing Arduino IDE
First, you need to install Arduino IDE Software from its official website Arduino. Here is a simple step-by-step guide on “How to install Arduino IDE“.
Installing Libraries
Before you start uploading a code, download and unzip the following libraries at /Progam Files(x86)/Arduino/Libraries (default), in order to use the sensor with the Arduino board. Here is a simple step-by-step guide on “How to Add Libraries in Arduino IDE“.
Code
Now copy the following code and upload it to Arduino IDE Software.
#include <LiquidCrystal_I2C.h>
#include "DHT.h"
#define DHTPIN 2
#define DHTTYPE DHT11

LiquidCrystal_I2C lcd(0x3F, 16, 2);  // I2C address 0x3F, 16 column and 2 rows
DHT dht(DHTPIN, DHTTYPE);

void setup()
{
  dht.begin();     // initialize the sensor
  lcd.init();      // initialize the lcd
  lcd.backlight(); // open the backlight
}

void loop()
{
  delay(2000); // wait a few seconds between measurements

  float humi  = dht.readHumidity();    // read humidity
  float tempC = dht.readTemperature(); // read temperature

  lcd.clear();
  // check if any reads failed
  if (isnan(humi) || isnan(tempC)) {
    lcd.setCursor(0, 0);
    lcd.print("Failed");
  } else {
    lcd.setCursor(0, 0);  // start to print at the first row
    lcd.print("Temp: ");
    lcd.print(tempC);     // print the temperature
    lcd.print((char)223); // print ° character
    lcd.print("C");

    lcd.setCursor(0, 1);  // start to print at the second row
    lcd.print("Humi: ");
    lcd.print(humi);      // print the humidity
    lcd.print("%");
  }
}
Working Explanation
The setup() function is executed once at the beginning of the program. In this function, the necessary libraries for the DHT11 sensor and the 16×2 LCD display are included. Then, the DHT11 sensor and the LCD display are initialized by specifying their connection pins. The baud rate of serial communication is also set in this function.
The loop() function is executed repeatedly, providing continuous readings of the temperature and humidity data. In this function, the code retrieves the temperature and humidity data from the DHT11 sensor using the dht.read() function. The retrieved data is then displayed on the 16×2 LCD screen using the lcd.print() function. The temperature and humidity readings are updated continuously, providing real-time information about the environment.
Applications
- Home automation systems
- Agriculture
- Weather stations
- Environmental monitoring
- HVAC systems
Conclusion.
We hope you have found this Temperature Humidity Sensor LCD Circuit very useful. If you feel any difficulty in making it feel free to ask anything in the comment section.