Introduction
Interfacing a force-sensing resistor (FSR) with an Arduino Uno is a popular project among electronics enthusiasts and hobbyists. Force-sensing resistors are simple yet effective sensors that are used to detect physical pressure or force. By measuring the change in resistance of the FSR when force is applied, it is possible to determine the amount of force applied. With an Arduino Uno and an FSR, you can create a variety of interesting projects such as a pressure-sensitive musical instrument or a touch-sensitive interactive display. In this project, the Arduino Uno is used to read and interpret the resistance values from the FSR to determine the amount of pressure applied, which is then displayed on the serial monitor.
A force-sensing resistor (FSR) is a type of pressure sensor that changes its resistance when pressure or force is applied. It consists of a polymer thick-film layer that is deposited on a flexible substrate, which is overlaid by two conductive layers separated by a thin spacer. When pressure is applied to the FSR, the polymer layer compresses and brings the two conductive layers into contact, causing the resistance to decrease.
Hardware Components
You will require the following hardware for Interfacing FSR402 Force Sensing Resistor with Arduino.
| S.no | Component | Value | Qty |
|---|---|---|---|
| 1. | Arduino UNO | – | 1 |
| 2. | USB Cable Type A to B | – | 1 |
| 3. | Force Sensor | – | 1 |
| 4. | Power Adapter for Arduino | 9V | 1 |
| 5. | Resistor | 10kΩ | 1 |
| 6. | Brekadboard | – | 1 |
| 7. | Jumper Wires | – | 1 |
Steps Interfacing Force Sensor with Arduino
- Define the analog pin A0 as the input to connect the force sensor.
#define FORCE_SENSOR_PIN A0 // the FSR and 10K pulldown are connected to A0
- Set up the serial communication and start the serial communication at a baud rate of 9600.
void setup() {
  Serial.begin(9600);
}
- In the loop, read the analog value from the force sensor using the analogRead() function.
int analogReading = analogRead(FORCE_SENSOR_PIN);
- Print the analog reading of the force sensor to the serial monitor using the Serial.print() function.
Serial.print("Force sensor reading = ");
Serial.print(analogReading); // print the raw analog reading
- Check the analog reading and print the corresponding message based on the force applied. If the analog reading is less than 10, print “no pressure”; if it is between 10 and 199, print “light touch”; if it is between 200 and 499, print “light squeeze”; if it is between 500 and 799, print “medium squeeze”; if it is greater than or equal to 800, print “big squeeze”.
if (analogReading < 10)       // from 0 to 9
    Serial.println(" -> no pressure");
  else if (analogReading < 200) // from 10 to 199
    Serial.println(" -> light touch");
  else if (analogReading < 500) // from 200 to 499
    Serial.println(" -> light squeeze");
  else if (analogReading < 800) // from 500 to 799
    Serial.println(" -> medium squeeze");
  else // from 800 to 1023
    Serial.println(" -> big squeeze");
- Add a delay of 1000 milliseconds to slow down the output.
delay(1000);Schematic
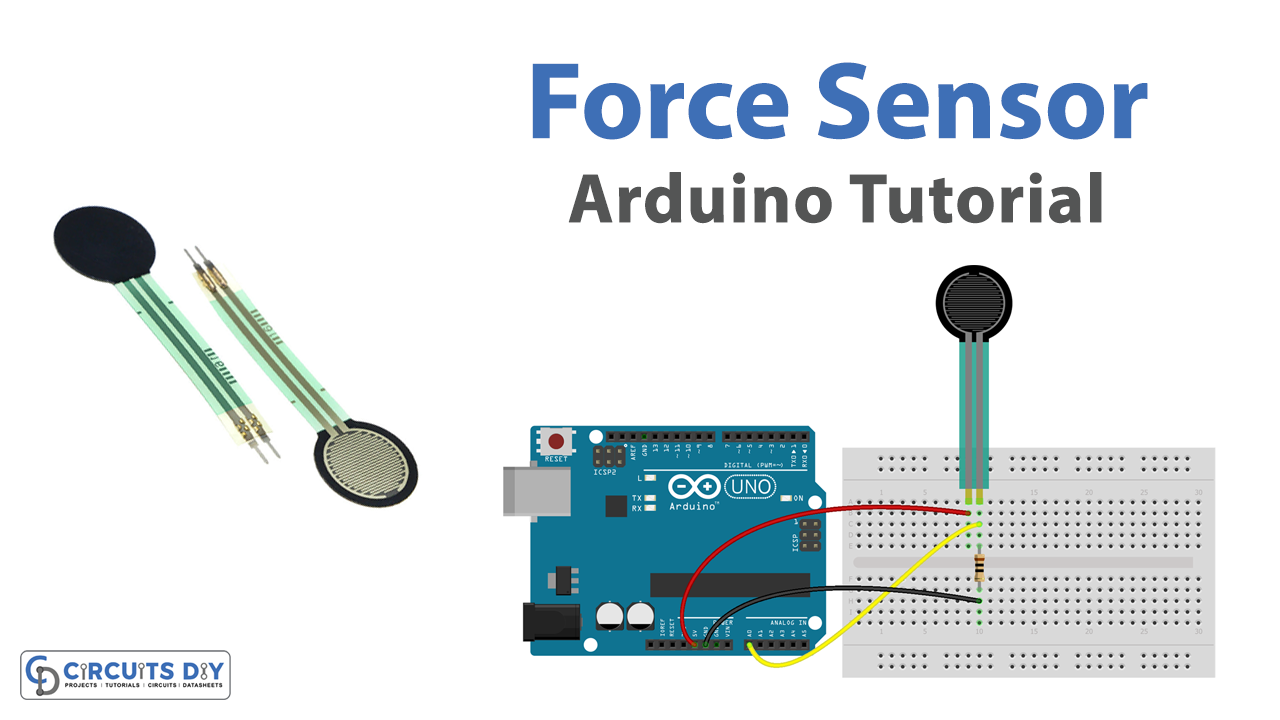
Make connections according to the circuit diagram given below.

Wiring / Connections
| Arduino | Force Sensor |
|---|---|
| 5V | VCC |
| GND | GND(pin 2) |
| A0 | PIN 2 |
Installing Arduino IDE
First, you need to install Arduino IDE Software from its official website Arduino. Here is a simple step-by-step guide on “How to install Arduino IDE“.
Code
Now copy the following code and upload it to Arduino IDE Software.
#define FORCE_SENSOR_PIN A0 // the FSR and 10K pulldown are connected to A0

void setup() {
  Serial.begin(9600);
}

void loop() {
  int analogReading = analogRead(FORCE_SENSOR_PIN);

  Serial.print("Force sensor reading = ");
  Serial.print(analogReading); // print the raw analog reading

  if (analogReading < 10)       // from 0 to 9
    Serial.println(" -> no pressure");
  else if (analogReading < 200) // from 10 to 199
    Serial.println(" -> light touch");
  else if (analogReading < 500) // from 200 to 499
    Serial.println(" -> light squeeze");
  else if (analogReading < 800) // from 500 to 799
    Serial.println(" -> medium squeeze");
  else // from 800 to 1023
    Serial.println(" -> big squeeze");

  delay(1000);
}
Working Explanation
This code reads and analyzes the analog signal received from a force-sensing resistor (FSR) connected to an Arduino Uno. The FSR is connected to analog pin A0 of the Arduino, with a 10K ohm pulldown resistor in parallel. The program reads the analog signal and prints the corresponding force applied to the FSR, based on the range of the analog reading. The setup function initializes the serial communication between the Arduino and the computer.
The loop function repeatedly reads the analog signal and determines the corresponding force applied to the FSR. It prints the raw analog reading and the force measurement in the serial monitor, with messages such as “no pressure,” “light touch,” “light squeeze,” “medium squeeze,” or “big squeeze.” The delay function is used to prevent rapid printing of results and allow time for the sensor to settle between readings.
Applications
- Robotics and automation
- Human-computer interaction
- Gaming and virtual reality
- Medical devices and instruments
- Sports equipment and training tools
- Musical instruments and controllers
- Quality control and testing
- Safety and security systems
- Structural health monitoring
Conclusion.
We hope you have found this Force Sensor Circuit very useful. If you feel any difficulty in making it feel free to ask anything in the comment section.