Introduction
Storing and retrieving configuration data from an Arduino SD card module with an Arduino UNO is a crucial aspect of many projects that involve collecting and analyzing data. An SD card module allows for the easy and efficient storage of large amounts of data, making it an ideal solution for applications where data logging is required. The Arduino UNO, a popular microcontroller board, provides an easy-to-use platform for developing and implementing various projects. By utilizing an SD card module with an Arduino UNO, developers can design solutions that can be easily deployed and scaled to meet their specific needs.
An Arduino SD card module is a type of expansion board designed to enable Arduino boards to communicate with SD (Secure Digital) cards. These modules contain an SD card slot, which allows for data to be read from or written to an SD card. By using an SD card module with an Arduino board, you can create projects that involve data logging, data storage, and data retrieval, among other things.
Hardware Components
You will require the following hardware for IRead Config from SD Card with Arduino.
| S.no | Component | Value | Qty |
|---|---|---|---|
| 1. | Arduino UNO | – | 1 |
| 2. | USB Cable Type A to B | – | 1 |
| 3. | Micro SD Card | – | 1 |
| 4. | Micro SD Card Module | – | 1 |
| 5. | USB 3.0 SD Card Reader | – | 1 |
| 6. | 9V Power Adapter for Arduino | – | 1 |
| 7. | Jumper Wires | – | 1 |
Read from SD Card with Arduino
Step 1: Include the SD library
#include <SD.h>
The SD.h the library provides an interface for reading and writing SD cards.
Step 2: Define the SPI Chip Select (CS) pin
#define PIN_SPI_CS 4
This line defines the CS pin that is used to communicate with the SD card over the SPI protocol.
Step 3: Define the name of the configuration file
#define FILE_NAME "config.txt"
This line defines the name of the configuration file that will be read from and written to.
Step 4: Define the maximum length of the key and value strings
#define KEY_MAX_LENGTH    30 // change it if key is longer
#define VALUE_MAX_LENGTH  30 // change it if value is longer
These constants define the maximum length of the key and value strings that can be read from the configuration file. These values can be changed if longer strings are required.
Step 5: Declare global variables
int myInt_1;
int myInt_2;
float myFloat_1;
float myFloat_2;
String myString_1;
String myString_2;
These variables will hold the values that are read from the configuration file.
Step 6: Define the setup function
void setup() {
  Serial.begin(9600);

  if (!SD.begin(PIN_SPI_CS)) {
    Serial.println(F("SD Card failed, or not present"));
    while (1); // don't do anything more:
  }

  Serial.println(F("SD Card initialized."));

  myInt_1    = SD_findInt(F("myInt_1"));
  myInt_2    = SD_findInt(F("myInt_2"));
  myFloat_1  = SD_findFloat(F("myFloat_1"));
  myFloat_2  = SD_findFloat(F("myFloat_2"));
  myString_1 = SD_findString(F("myString_1"));
  myString_2 = SD_findString(F("myString_2"));

  Serial.print(F("myInt_1 = "));
  Serial.println(myInt_1);

  Serial.print(F("myInt_2 = "));
  Serial.println(myInt_2);

  Serial.print(F("myFloat_1 = "));
  Serial.println(myFloat_1);

  Serial.print(F("myFloat_2 = "));
  Serial.println(myFloat_2);

  Serial.print(F("myString_1 = "));
  Serial.println(myString_1);

  Serial.print(F("myString_2 = "));
  Serial.println(myString_2);
}
This function is called once when the Arduino starts up. It initializes the Serial port, initializes the SD card, reads the values from the configuration file, and prints them to the Serial console.
Step 7: Define the loop function
void loop() {

}
Schematic
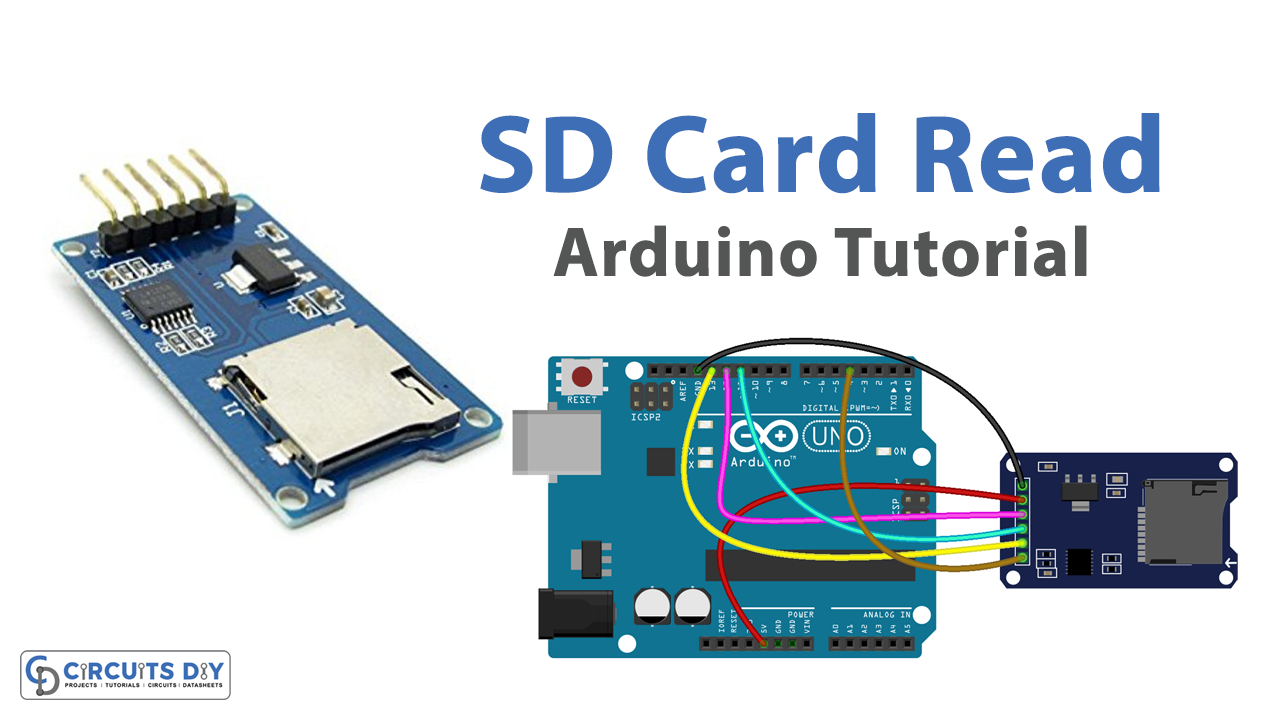
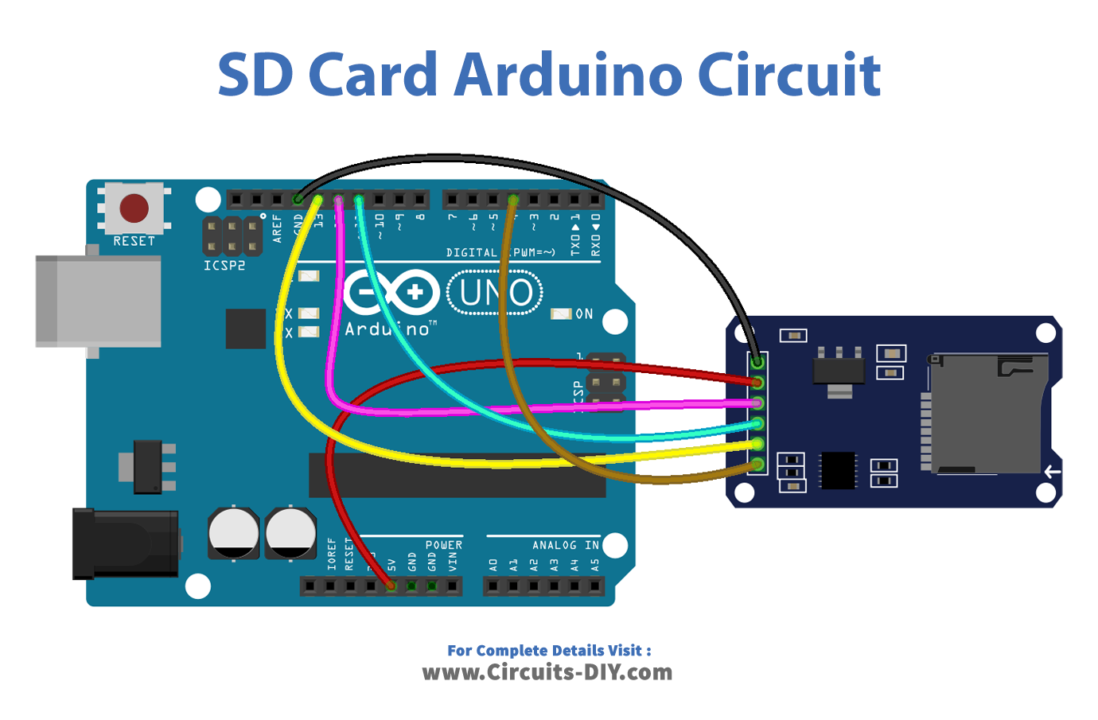
Make connections according to the circuit diagram given below.
Wiring / Connections
| Arduino | Sensor |
|---|---|
| 5V | VCC |
| GND | GND |
| D12 | MSO |
| D11 | MOSI |
| D13 | SCK |
| D4 | CS |
Installing Arduino IDE
First, you need to install Arduino IDE Software from its official website Arduino. Here is a simple step-by-step guide on “How to install Arduino IDE“.
Installing Libraries
Before you start uploading a code, download and unzip the following libraries at /Progam Files(x86)/Arduino/Libraries (default), in order to use the sensor with the Arduino board. Here is a simple step-by-step guide on “How to Add Libraries in Arduino IDE“.
Code
Now copy the following code and upload it to Arduino IDE Software.
#include <SD.h>

#define PIN_SPI_CS 4

#define FILE_NAME "config.txt"

#define KEY_MAX_LENGTH    30 // change it if key is longer
#define VALUE_MAX_LENGTH  30 // change it if value is longer


// variables
int myInt_1;
int myInt_2;
float myFloat_1;
float myFloat_2;
String myString_1;
String myString_2;

void setup() {
  Serial.begin(9600);

  if (!SD.begin(PIN_SPI_CS)) {
    Serial.println(F("SD Card failed, or not present"));
    while (1); // don't do anything more:
  }

  Serial.println(F("SD Card initialized."));

  myInt_1    = SD_findInt(F("myInt_1"));
  myInt_2    = SD_findInt(F("myInt_2"));
  myFloat_1  = SD_findFloat(F("myFloat_1"));
  myFloat_2  = SD_findFloat(F("myFloat_2"));
  myString_1 = SD_findString(F("myString_1"));
  myString_2 = SD_findString(F("myString_2"));

  Serial.print(F("myInt_1 = "));
  Serial.println(myInt_1);

  Serial.print(F("myInt_2 = "));
  Serial.println(myInt_2);

  Serial.print(F("myFloat_1 = "));
  Serial.println(myFloat_1);

  Serial.print(F("myFloat_2 = "));
  Serial.println(myFloat_2);

  Serial.print(F("myString_1 = "));
  Serial.println(myString_1);

  Serial.print(F("myString_2 = "));
  Serial.println(myString_2);
}

void loop() {

}


bool SD_available(const __FlashStringHelper * key) {
  char value_string[VALUE_MAX_LENGTH];
  int value_length = SD_findKey(key, value_string);
  return value_length > 0;
}

int SD_findInt(const __FlashStringHelper * key) {
  char value_string[VALUE_MAX_LENGTH];
  int value_length = SD_findKey(key, value_string);
  return HELPER_ascii2Int(value_string, value_length);
}

float SD_findFloat(const __FlashStringHelper * key) {
  char value_string[VALUE_MAX_LENGTH];
  int value_length = SD_findKey(key, value_string);
  return HELPER_ascii2Float(value_string, value_length);
}

String SD_findString(const __FlashStringHelper * key) {
  char value_string[VALUE_MAX_LENGTH];
  int value_length = SD_findKey(key, value_string);
  return HELPER_ascii2String(value_string, value_length);
}

int SD_findKey(const __FlashStringHelper * key, char * value) {
  File configFile = SD.open(FILE_NAME);

  if (!configFile) {
    Serial.print(F("SD Card: error on opening file "));
    Serial.println(FILE_NAME);
    return;
  }

  char key_string[KEY_MAX_LENGTH];
  char SD_buffer[KEY_MAX_LENGTH + VALUE_MAX_LENGTH + 1]; // 1 is = character
  int key_length = 0;
  int value_length = 0;

  // Flash string to string
  PGM_P keyPoiter;
  keyPoiter = reinterpret_cast<PGM_P>(key);
  byte ch;
  do {
    ch = pgm_read_byte(keyPoiter++);
    if (ch != 0)
      key_string[key_length++] = ch;
  } while (ch != 0);

  // check line by line
  while (configFile.available()) {
    int buffer_length = configFile.readBytesUntil('\n', SD_buffer, 100);
    if (SD_buffer[buffer_length - 1] == '\r')
      buffer_length--; // trim the \r

    if (buffer_length > (key_length + 1)) { // 1 is = character
      if (memcmp(SD_buffer, key_string, key_length) == 0) { // equal
        if (SD_buffer[key_length] == '=') {
          value_length = buffer_length - key_length - 1;
          memcpy(value, SD_buffer + key_length + 1, value_length);
          break;
        }
      }
    }
  }

  configFile.close();  // close the file
  return value_length;
}

int HELPER_ascii2Int(char *ascii, int length) {
  int sign = 1;
  int number = 0;

  for (int i = 0; i < length; i++) {
    char c = *(ascii + i);
    if (i == 0 && c == '-')
      sign = -1;
    else {
      if (c >= '0' && c <= '9')
        number = number * 10 + (c - '0');
    }
  }

  return number * sign;
}

float HELPER_ascii2Float(char *ascii, int length) {
  int sign = 1;
  int decimalPlace = 0;
  float number  = 0;
  float decimal = 0;

  for (int i = 0; i < length; i++) {
    char c = *(ascii + i);
    if (i == 0 && c == '-')
      sign = -1;
    else {
      if (c == '.')
        decimalPlace = 1;
      else if (c >= '0' && c <= '9') {
        if (!decimalPlace)
          number = number * 10 + (c - '0');
        else {
          decimal += ((float)(c - '0') / pow(10.0, decimalPlace));
          decimalPlace++;
        }
      }
    }
  }

  return (number + decimal) * sign;
}

String HELPER_ascii2String(char *ascii, int length) {
  String str;
  str.reserve(length);
  str = "";

  for (int i = 0; i < length; i++) {
    char c = *(ascii + i);
    str += String(c);
  }

  return str;
}
Working Explanation
The setup() function initializes the Serial communication and checks if the SD card is present and can be accessed. It then retrieves the values from the configuration file using the helper functions SD_findInt(), SD_findFloat(), and SD_findString(). The retrieved values are printed to the Serial Monitor.
The loop() function is empty and does nothing. The code defines several helper functions, including SD_available(), SD_findKey(), HELPER_ascii2Int(), and HELPER_ascii2Float(). These functions are used by the main functions (SD_findInt(), SD_findFloat(), and SD_findString()) to read and convert the values in the configuration file.
Applications
- Data logging
- Sensor calibration
- System configuration and parameterization
- Firmware update
- User interface customization
- Remote control and monitoring.
Conclusion.
We hope you have found this Read Config from SD Card tutorial very useful. If you feel any difficulty in making it feel free to ask anything in the comment section.

