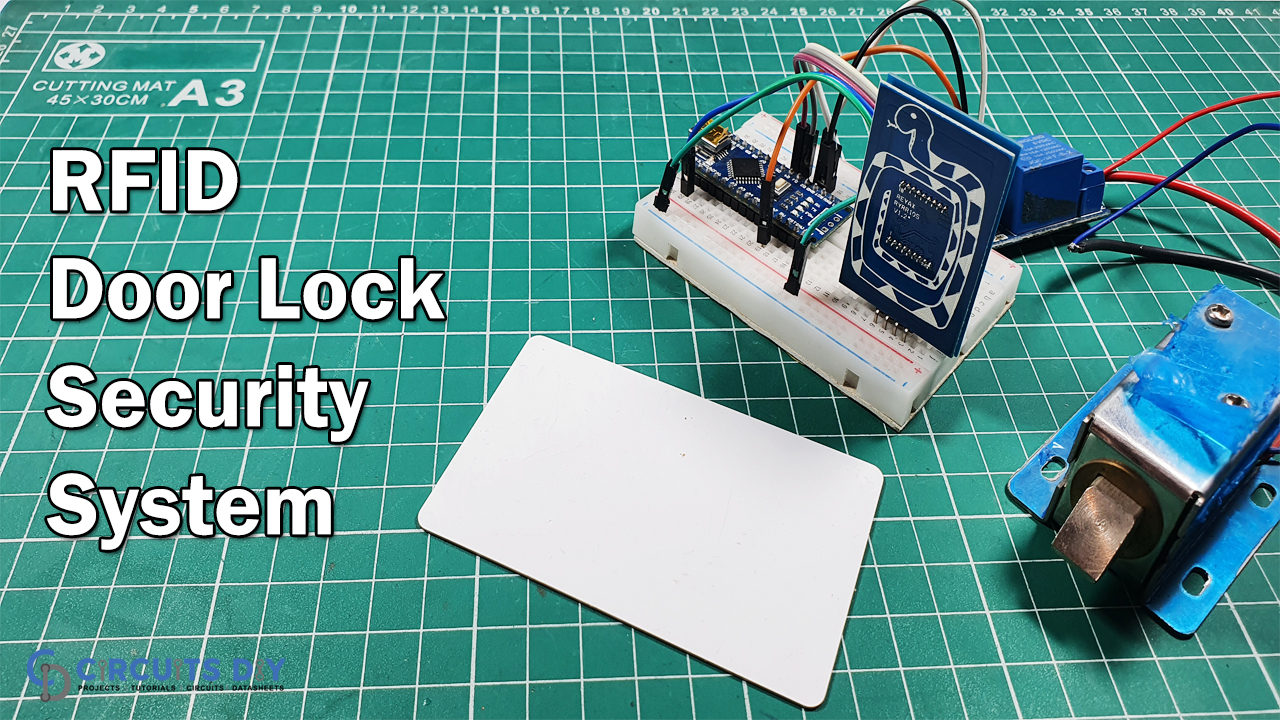
Security is significant to deal with for any place. Whether, enterprises, banks, exhibition halls, or homes, it’s critical to make each place secure. Along these lines, today in this tutorial, we are making RFID Based Security Doorlock System using RYRR10S. Controller Door Locks allow Wireless Control. This implies one can open or lock their entryways with only a single tick from their cell phone or act out of control. It replaces the traditional lock framework and gives a much safer lock.
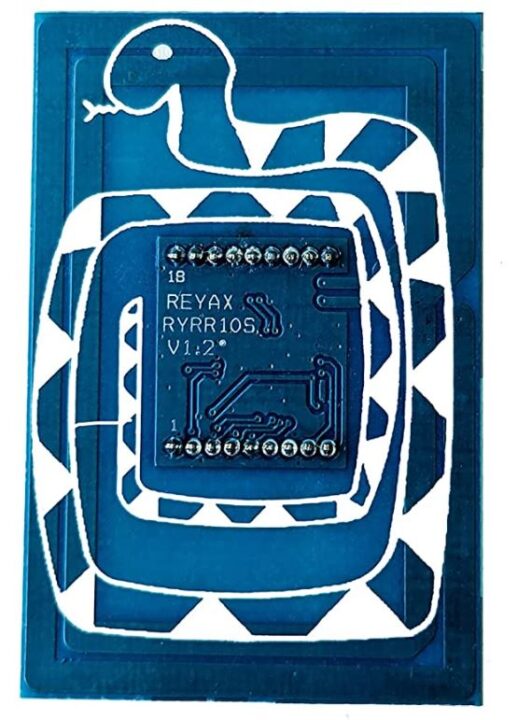
For the making of this circuit, we are using the RYRR10S RFID module. Radio Frequency Identification that is abbreviated as RFID, utilizes electromagnetic fields to automatically recognize the tags. The RFID tag stores an extended range of information in it. The RFID tags powered the RFID reader to read. RFID emits the radio waves to emit the signal back from the tag.
Features of RYRR10S RFID Module
ST CR95HF NFC/RFID Engine.
Supports Near Field Communication (NFC) ISO/IEC 18092.
// Circuits DIY
// For Complete Details Visit -> https://circuits-diy.com

#include <LiquidCrystal.h>
#include <SoftwareSerial.h>
SoftwareSerial NFCserial(4, 5); //RX, TX

const int rs = 13, en = 12, d4 = 11, d5 = 10, d6 = 9, d7 = 8;
LiquidCrystal lcd(rs, en, d4, d5, d6, d7);

const int lock_pin = 2;

uint8_t echo_command[2] = {0x55};
uint8_t info_command[2] = {0x01, 0x00};

//uint8_t protocol_command_iso15693[4]  =  {0x02, 0x02, 0x01, 0x05};
uint8_t protocol_command_iso14443a[4] =  {0x02, 0x02, 0x02, 0x00};
//uint8_t protocol_command_iso14443b[4] =  {0x02, 0x02, 0x03, 0x01};
//uint8_t protocol_command_iso18092[4]  =  {0x02, 0x02, 0x04, 0x51};

//uint8_t detect_command_iso15693[5]  =  {0x04, 0x03, 0x26, 0x01, 0x00};
uint8_t detect_command_iso14443a[4] =  {0x04, 0x02, 0x26, 0x07};
//uint8_t detect_command_iso14443b[5] =  {0x04, 0x03, 0x05, 0x00, 0x00};
//uint8_t detect_command_iso18092[7]  =  {0x04, 0x05, 0x00, 0xFF, 0xFF, 0x00, 0x00};

uint8_t received_data[256];
uint8_t received_buf_pos;
uint8_t response_byte;
uint8_t data_len;
boolean received_complete;
String received_id = "";

void init_nfc(){
  NFCserial.begin(57600);
  delay(10);

  Serial.println("Receiving device info...");
  NFCserial.write(info_command, 2);
  delay(100);
  show_serial_data();
  Serial.println("");

  delay(2000);

  Serial.println("Sending protocol settings...");
  //NFCserial.write(protocol_command_iso15693, 4);
  NFCserial.write(protocol_command_iso14443a, 4);
  //NFCserial.write(protocol_command_iso14443b, 4);
  //NFCserial.write(protocol_command_iso18092, 4);
  delay(100);
  show_serial_data();
  Serial.println("");
  delay(2000);

  lcd.clear();
  lcd.print("Door is locked");
}


void serial_receive(){
  uint8_t received_char;

  while(NFCserial.available()!=0){
    received_char = char (NFCserial.read());

    //the first byte of the received message is the response
    if(received_buf_pos == 0){
      response_byte = received_char;
      }

    //second byte of the received data is the data length
    else if(received_buf_pos == 1){
      data_len = received_char;
      }

    else if(received_buf_pos == 2){

      }

    else if(received_buf_pos == 3){

      }

    else{
      received_data[received_buf_pos-4] = received_char;
      received_id += received_char; //adding to a string
      }
    received_buf_pos++;

    if(received_buf_pos >= data_len){
      received_complete = true;
      }
    }
}


void scan_tag(){
  received_buf_pos = 0;
  received_complete = false;

  Serial.println("Searching new card...");
  //NFCserial.write(detect_command_iso15693, 5);
  NFCserial.write(detect_command_iso14443a, 4);
  //NFCserial.write(detect_command_iso14443b, 5);
  //NFCserial.write(detect_command_iso18092, 7);
  delay(20);
  if(NFCserial.available()) serial_receive();
  else return;
  if(response_byte == 0x80){
    Serial.println("Tag detected...");
    Serial.print("ID in HEX: ");
    for(int pos=7; pos>=0; pos--){
      Serial.print(received_data[pos], HEX);
      }
      Serial.println("");
    Serial.print("ID in DEC: ");
    Serial.println(received_id);
    delay(2000); //this is important
    }
   else{
    Serial.println("No tag detected.");
    }
   //comparing the authorize id
   if(received_id == "4000"){
    lcd.clear();
    lcd.print("Authorized");
    delay(2000);
    //open the lock
    Serial.println("lock open");
    digitalWrite(lock_pin, HIGH);
    lcd.clear();
    lcd.print("Lock is open");
    delay(10000);
    digitalWrite(lock_pin, LOW);
    lcd.clear();
    lcd.print("Lock is closed");
    delay(1000);
    received_id = "";
    delay(2000);
    }
}

void setup() {
  Serial.begin(9600);
  lcd.begin(16, 2);
  lcd.print("Initializing...");
  pinMode(lock_pin, OUTPUT);
  delay(5000);
  init_nfc();
}

void loop() {
  scan_tag();
  delay(100);
}

// this display the debug message
void show_serial_data()
{
  while(NFCserial.available()!=0)  /* If data is available on serial port */
  Serial.print(NFCserial.read(), HEX); /* Print character received on to the serial monitor */
}
Working Explanation
In an RFID entryway lock access control circuit, the credential of the user contains unique data known as a tag. At the point when the user comes extremely close to a reader, the reader finds the data on the client’s RFID tag and sends it through radio antennas and transceivers to approve the tag in the entrance control system. When the reading gets completed, the system will either acknowledge or deny the request to open the entryway (here in our case, solenoid lock).
Applications
We can use it in our home security system.
We can use it in offices to only allow the working faculty.