Introduction
An HC-SR04 ultrasonic sensor distance threshold dependent 5V SPDT relay using an Arduino UNO is a system that uses an ultrasonic sensor (HC-SR04) to measure the distance of an object in front of it and a 5V Single Pole Double Throw (SPDT) relay to control an external device based on that distance. The threshold distance is set in centimeters and can be adjusted as desired.
The ultrasonic sensor sends out a sound wave and measures the time it takes for the sound wave to bounce back to the sensor to calculate the distance of the object. The Arduino UNO is used as a microcontroller to read the distance from the ultrasonic sensor and control the SPDT relay based on the distance.
Hardware Components
You will require the following hardware for Ultrasonic Sensor Relay.
| S.no | Component | Value | Qty |
|---|---|---|---|
| 1. | Arduino UNO | – | 1 |
| 2. | USB Cable Type A to B | – | 1 |
| 3. | Ultrasonic Sensor | – | 1 |
| 4. | Relay | – | 1 |
| 5. | Warning Light Bright Waterproof | – | 1 |
| 6. | Power Adapter | 12V | 1 |
| 7. | DC Power Jack | – | 1 |
| 8. | Power Adapter for Arduino | 9V | 1 |
| 9. | Jumper Wires | – | 1 |
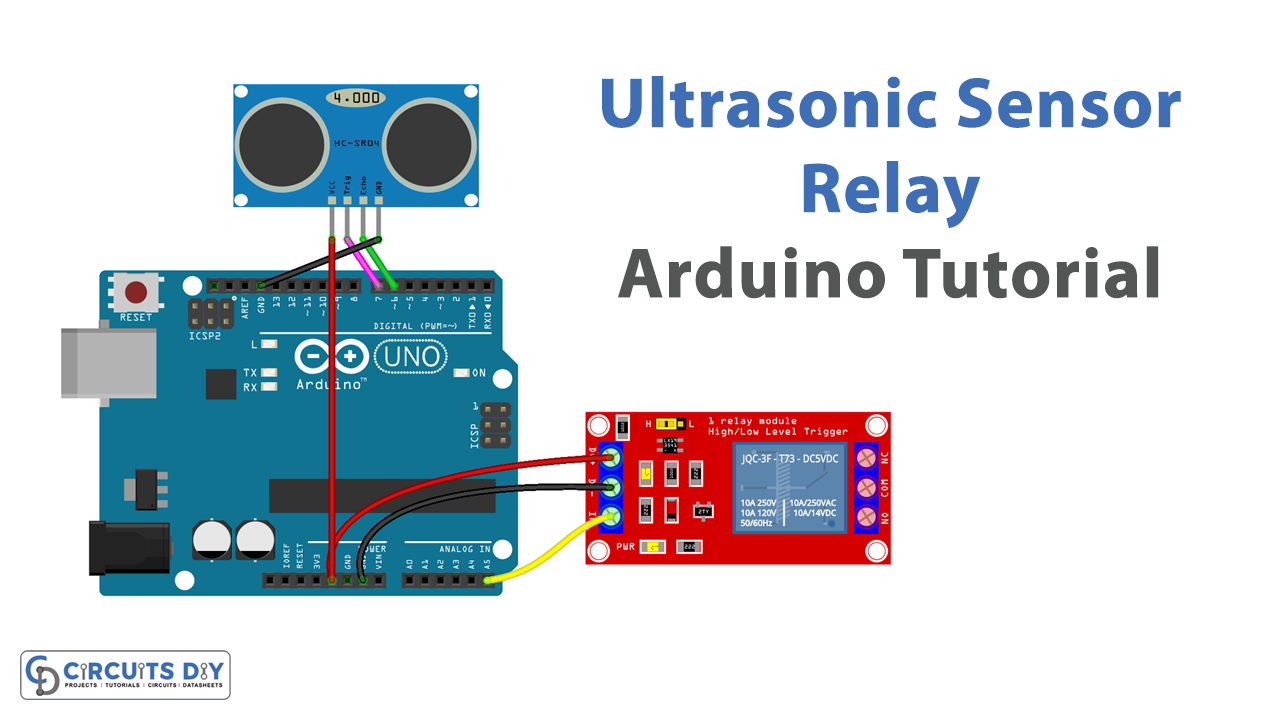
Ultrasonic Sensor Relay with Arduino
- Connect the HC-SR04 ultrasonic sensor to the Arduino Uno as follows:
- VCC pin to 5V
- Trig pin to digital pin 2
- Echo pin to digital pin 3
- GND pin to GND
- Connect the 5V SPDT Relay to the Arduino Uno as follows:
- IN1 pin to digital pin 4
- GND pin to GND
- In the Arduino IDE, include the following library at the beginning of the code:
#include <Ultrasonic.h>
- Define the pin numbers for the ultrasonic sensor and the relay in the setup function:
Ultrasonic ultrasonic(2, 3);
int relay_pin = 4;
pinMode(relay_pin, OUTPUT);
- In the loop function, use the
distanceRead()function to get the distance in centimeters from the ultrasonic sensor, and store it in a variable. Then, use an if statement to check if the distance is less than a threshold value (in centimeters). If the distance is less than the threshold, turn on the relay using thedigitalWrite()function with valueHIGH, otherwise, turn it off using thedigitalWrite()function with valueLOW.
void loop() {
  int distance = ultrasonic.distanceRead();
  if (distance < threshold) {
    digitalWrite(relay_pin, HIGH);
  } else {
    digitalWrite(relay_pin, LOW);
  }
}
- To post the status of the relay on the serial monitor, use the
Serial.begin()function in the setup function to start serial communication, then use theSerial.print()function to print the status of the relay in the loop function.
void setup() {
  Serial.begin(9600);
  ...
}

void loop() {
  ...
  int relay_status = digitalRead(relay_pin);
  if (relay_status == HIGH) {
    Serial.println("Relay is on");
  } else {
    Serial.println("Relay is off");
  }
  ...
}
- Finally, upload the code to your Arduino Uno.
Schematic
Make connections according to the circuit diagram given below.
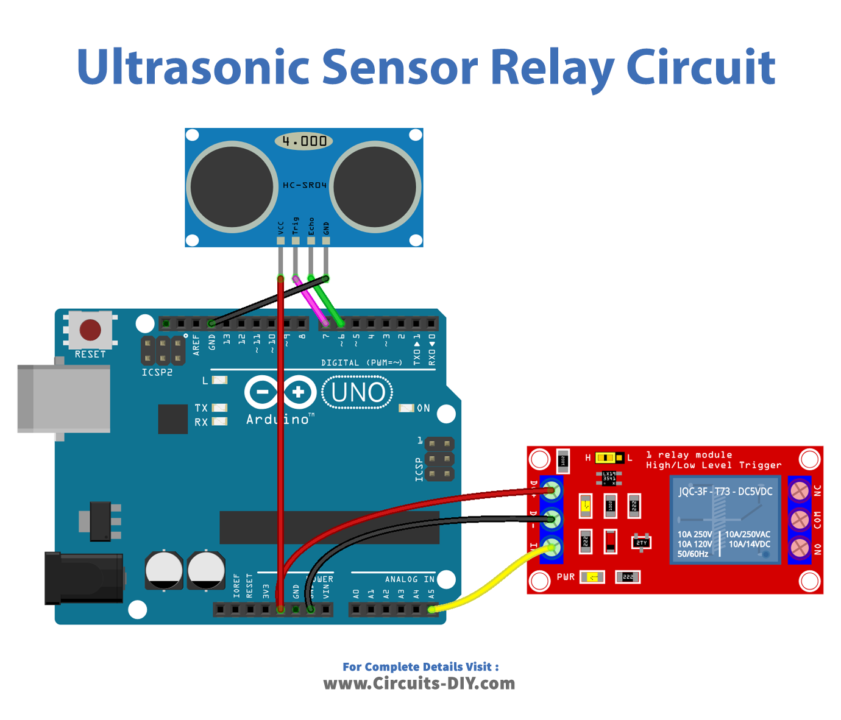
Wiring / Connections
| Arduino | Sensor | Relay |
|---|---|---|
| 5V | VCC | VCC |
| GND | GND | GND |
| D7 | TRIG | |
| D6 | ECHO | |
| A5 | SIG |
Installing Arduino IDE
First, you need to install Arduino IDE Software from its official website Arduino. Here is a simple step-by-step guide on “How to install Arduino IDE“.
Code
Now copy the following code and upload it to Arduino IDE Software.
const int TRIG_PIN  = 7;  // Arduino pin connected to Ultrasonic Sensor's TRIG pin
const int ECHO_PIN  = 6;  // Arduino pin connected to Ultrasonic Sensor's ECHO pin
const int RELAY_PIN = A5; // Arduino pin connected to Relay's pin
const int DISTANCE_THRESHOLD = 50; // centimeters

// variables will change:
float duration_us, distance_cm;

void setup() {
  Serial.begin (9600);        // initialize serial port
  pinMode(TRIG_PIN, OUTPUT);  // set arduino pin to output mode
  pinMode(ECHO_PIN, INPUT);   // set arduino pin to input mode
  pinMode(RELAY_PIN, OUTPUT); // set arduino pin to output mode
}

void loop() {
  // generate 10-microsecond pulse to TRIG pin
  digitalWrite(TRIG_PIN, HIGH);
  delayMicroseconds(10);
  digitalWrite(TRIG_PIN, LOW);

  // measure duration of pulse from ECHO pin
  duration_us = pulseIn(ECHO_PIN, HIGH);
  // calculate the distance
  distance_cm = 0.017 * duration_us;

  if(distance_cm < DISTANCE_THRESHOLD)
    digitalWrite(RELAY_PIN, HIGH); // turn on Relay
  else
    digitalWrite(RELAY_PIN, LOW);  // turn off Relay

  // print the value to Serial Monitor
  Serial.print("distance: ");
  Serial.print(distance_cm);
  Serial.println(" cm");

  delay(500);
}
Working Explanation
In the setup function, the Arduino’s serial communication is initialized with Serial.begin(9600) and the ultrasonic sensor and relay pins are defined. The ultrasonic sensor is initialized by creating an object of the Ultrasonic class and passing the trigger and echo pin numbers. The relay pin is defined as an output pin using the pinMode() function.
In the loop function, the distance from the ultrasonic sensor is read using the distanceRead() function from the Ultrasonic library and stored in a variable. Then, an if statement is used to check if the distance is less than the threshold distance (in centimeters). If the distance is less than the threshold, the relay is turned on by setting the relay pin to HIGH with the digitalWrite() function, otherwise the relay is turned off by setting the relay pin to LOW. The status of the relay is also posted on the serial monitor by using the Serial.println() function.
Applications
- Obstacle Detection
- Automated Door Control
- Level Detection
- Parking Assistance
- Automatic Light Control
- Proximity Alarm
- Automatic Faucet Control
- Robot Navigation
Conclusion.
We hope you have found this Ultrasonic Sensor Relay Circuit very useful. If you feel any difficulty in making it feel free to ask anything in the comment section.