Introduction
This article will dive into interfacing the powerful DX-BT18 Dual-Mode Bluetooth Module with an Arduino board. Imagine controlling your robotics creations remotely with your phone or computer or sending data wirelessly to a remote monitoring system. The possibilities are endless! In the following steps, we’ll walk you through setting up your DX-BT18 module and connecting it to an Arduino board, and by the end, you’ll be well on your way to creating your own wireless masterpieces.
You can use this module to communicate with other devices, whether old or new Bluetooth low-energy devices. This makes it a perfect solution for many projects and applications. You’ll be amazed at how easy it is to get started with this module. So, let’s get started!
What is DX-BT18 Dual-Mode Bluetooth?
The DX-BT18 Bluetooth module is a kind of dual-mode Bluetooth module (Dual-Mode) that was developed specifically for the purpose of facilitating the transfer of smart wireless data. This module has many potential uses, including wireless applications and other Internet of Things (IoT) devices.

Hardware Components
You will require the following hardware for Interfacing DX-BT18 Dual-Mode Bluetooth Module with Arduino.
| S.no | Component | Value | Qty |
|---|---|---|---|
| 1. | Arduino UNO | – | 1 |
| 2. | Serial Bluetooth Module | DX-BT18 | 1 |
| 3. | Breadboard | – | 1 |
| 4. | Jumper Wires | – | 1 |
DX-BT18 Dual-Mode Bluetooth with Arduino
To interface the module and Arduino, follow the given steps:
Schematic
Make connections according to the circuit diagram given below.
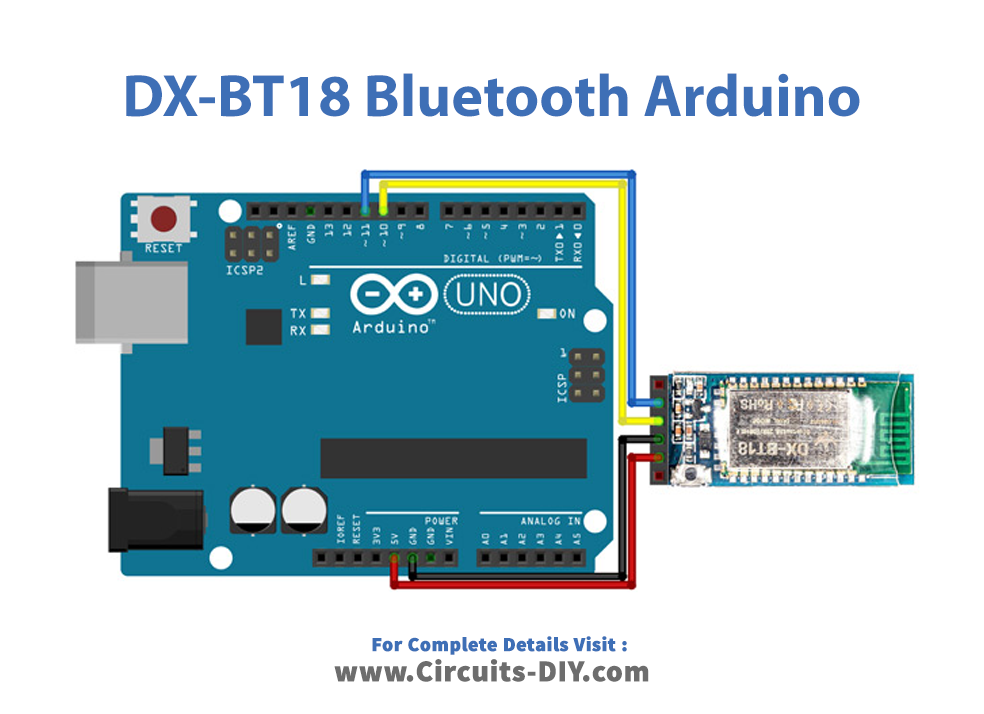
Wiring / Connections
| Arduino | Bluetooth Module |
|---|---|
| 5V | VCC |
| GND | GND |
| D10 | TX |
| D11 | DX |
Installing Arduino IDE
First, you need to install Arduino IDE Software from its official website Arduino. Here is a simple step-by-step guide on “How to install Arduino IDE“.
Installing Libraries
Before you start uploading a code, download and unzip the following libraries at /Progam Files(x86)/Arduino/Libraries (default), in order to use the sensor with the Arduino board. Here is a simple step-by-step guide on “How to Add Libraries in Arduino IDE“.
Code
Now copy the following code and upload it to Arduino IDE Software.
  /*
  Modified on March 09, 2021
  Modified by MohammedDamirchi from https://github.com/PaulStoffregen/SoftwareSerial
  Home
*/


#include <SoftwareSerial.h>

SoftwareSerial mySerial(10, 11); // RX, TX

void setup() {
Open serial communications and wait for the port to open:
  Serial.begin(9600);
  while (!Serial) {
    ; // wait for serial port to connect. Needed for native USB port only
  }

  // set the data rate for the SoftwareSerial port
  mySerial.begin(9600);
}

void loop() { // run over and over
  if (mySerial.available()) {
    Serial.write(mySerial.read());
  }
  if (Serial.available()) {
    mySerial.write(Serial.read());
  }
Let’s Test It
With the code successfully uploaded, it’s time to test the circuit! Through a software serial port, the code makes it easy for the Arduino and another device to communicate. Data received from the software serial port is transmitted via the hardware serial port and vice versa, allowing for real-time bidirectional data exchange. This mechanism allows you to send and receive data simultaneously, which you can see in action!
Working Explanation
It is the coding on which the working is based on. So, lets look at the coding explanation!
- The #include <SoftwareSerial.h>, is a preprocessor directive that includes a library called “SoftwareSerial” in the code. This library allows a software serial port on the Arduino board.
- The next line SoftwareSerial mySerial(10, 11), creates an instance of the “SoftwareSerial” class with the name “mySerial” and assigns digital pins 10 and 11 as the RX (receive) and TX (transmit) pins for the software serial port, respectively. These pins can be changed as per the user’s requirement.
- The void setup() function is a built-in Arduino function that runs only once when the board is powered on or reset. Inside the setup() function:Serial.begin(9600); initializes the built-in serial port with a baud rate of 9600. Baud rate is the number of bits per second that are transmitted.
- while (!Serial) { ; } is a loop that waits for the serial port to be ready before continuing with the rest of the code.
- mySerial.begin(9600); sets the baud rate for the software serial port to 9600, the same as the built-in serial port.
- The void loop() function runs continuously after finishing the setup() function. Inside the loop() function:if (mySerial.available()) { Serial.write(mySerial.read()); } checks if there is data available on the software serial port. If there is, it reads the data and writes it to the built-in serial port.
- if (Serial.available()) { mySerial.write(Serial.read()); } checks if there is data available on the built-in serial port. If there is, it reads the data and writes it to the software serial port.
Applications
- Wireless automation
- Remote control devices
- IoT applications
- Robotics, etc
Conclusion.
We hope you have found this Interfacing DX-BT18 Dual-Mode Bluetooth Module with Arduino Circuit very useful. If you feel any difficulty making it feel free to ask anything in the comment section.